# Welcome
### Introduction to Natoma
Natoma empowers your organization to get the most out of AI. Natoma Agent Access helps you enable any individual in your organization to connect AI to key business applications, leveraging protocols like Model Context Protocol (MCP).
In just a few clicks, Natoma allows you to:
* **Connect LLMs & AI apps to tools & data sources** in a consistent, structured manner
* **Govern and control access** to ensure that only the appropriate permissions are delegated to AI
* **Maintain full visibility and auditability** over every tool and action taken by AI
With Natoma Agent Access, organizations can confidently adopt agentic AI across their entire organization without sacrificing security or control.
### Using Natoma
Your experience with Natoma depends on your role. Choose your role below to learn more:
# Getting Started
Use Natoma to connect AI to key business tools
Natoma enables you to connect AI clients to your business tools. The steps you follow depend on your role.
## Get started
### Step 1: Login or register [here](https://natoma.app/register).
## Choose your path
### For App Admins and Admins
Before members can connect to an app, you need to enable it:
* [Enable Apps](/connect-to-ai/getting-started/enable-apps) - Allow personal connections for an app
### For Members
Once apps have been enabled, connect your AI:
1. [Create a Connection](/connect-to-ai/getting-started/create-connection) - Set up a personal connection to an app
2. [Configure Your Client](/connect-to-ai/getting-started/configure-client) - Add Natoma to your AI tool
## Learn more by role
* [Natoma for Members](/role-guides/natoma-for-members) - What you can do as a Natoma user
* [Natoma for App Admins](/role-guides/natoma-for-app-admins) - Managing app-level AI access
* [Natoma for Admins](/role-guides/natoma-for-admins) - Organization-wide governance
# Enable Apps
Enable personal connections for an app
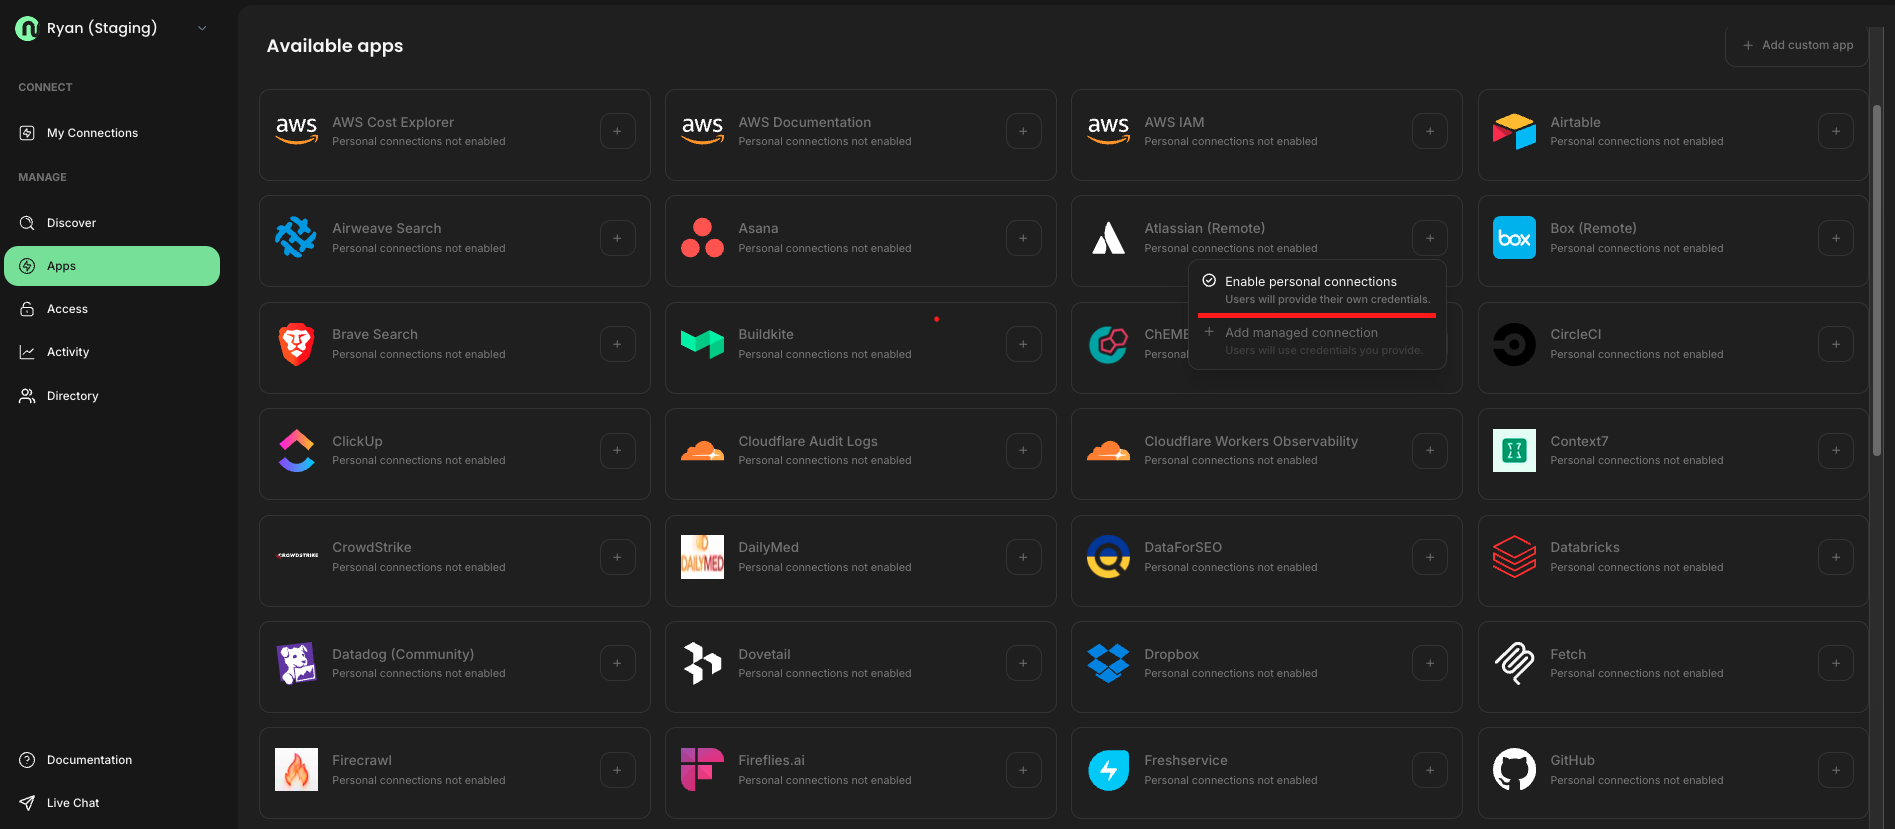
Before members can connect AI to an app, an App Admin or Admin must enable personal connections for that app.
## Enable personal connections
From the **Apps** page, locate the app you want to enable and toggle on personal connections.
Once enabled, members can create their own personal connections to this app from their **My Connections** page.
## Next steps
* To create shared connections with admin-managed credentials, see [Shared Access to Connections](/docs/manage-ai/shared-access)
* To distribute connections via profiles, see [Distribute Access via Profiles](/docs/manage-ai/profiles)
# Create a Connection
Create a personal connection
Once an app has been enabled for personal connections, you can create your own connection to use with AI.
## Step 1: Go to the My Connections page
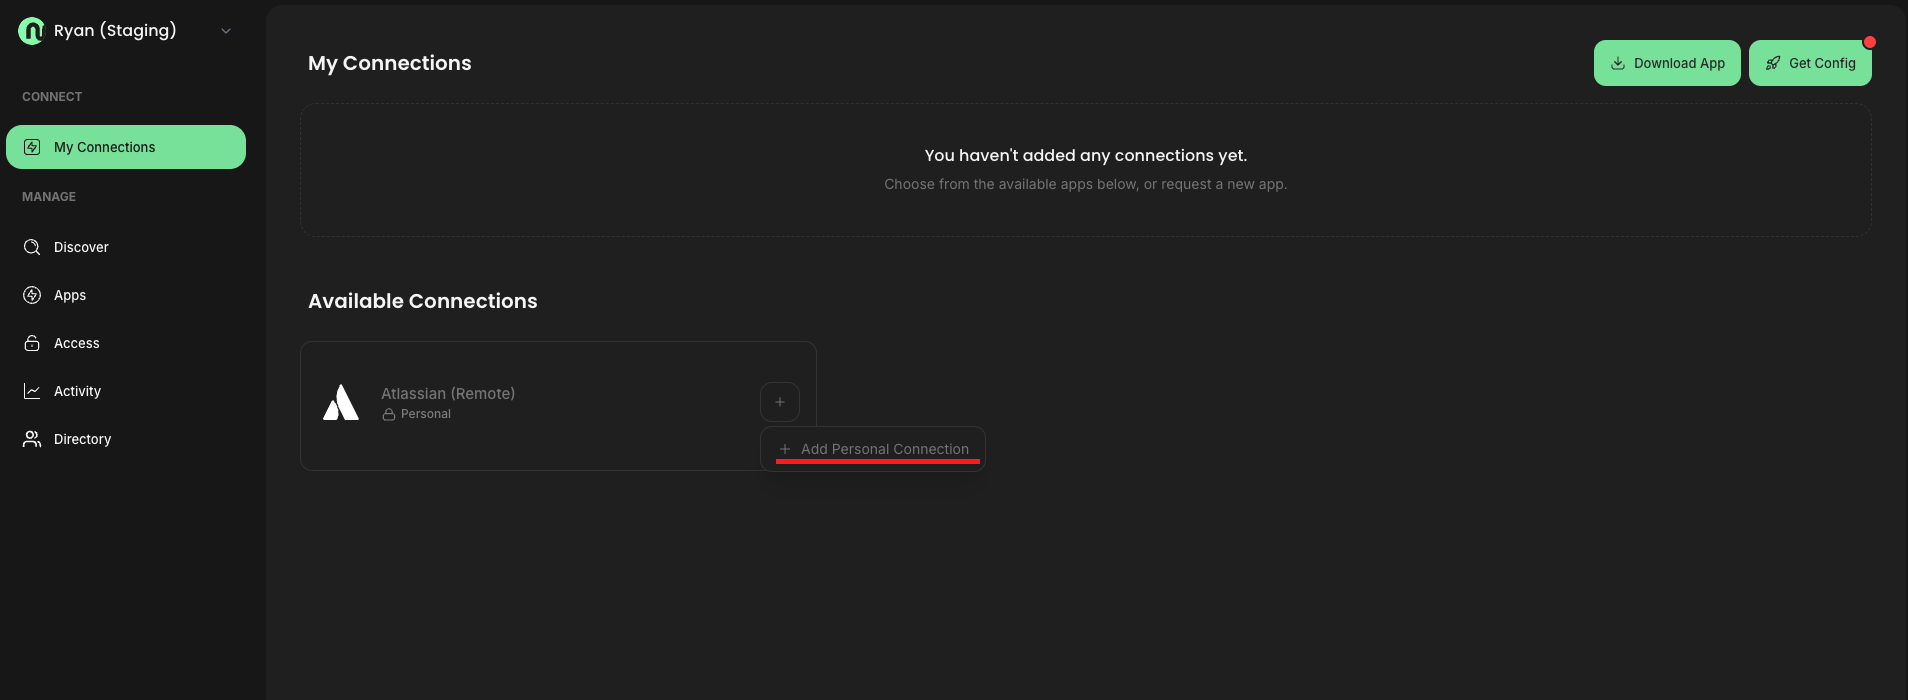
Navigate to the My Connections page and click to add a personal connection for the app you want to use.
## Step 2: Authorize the connection
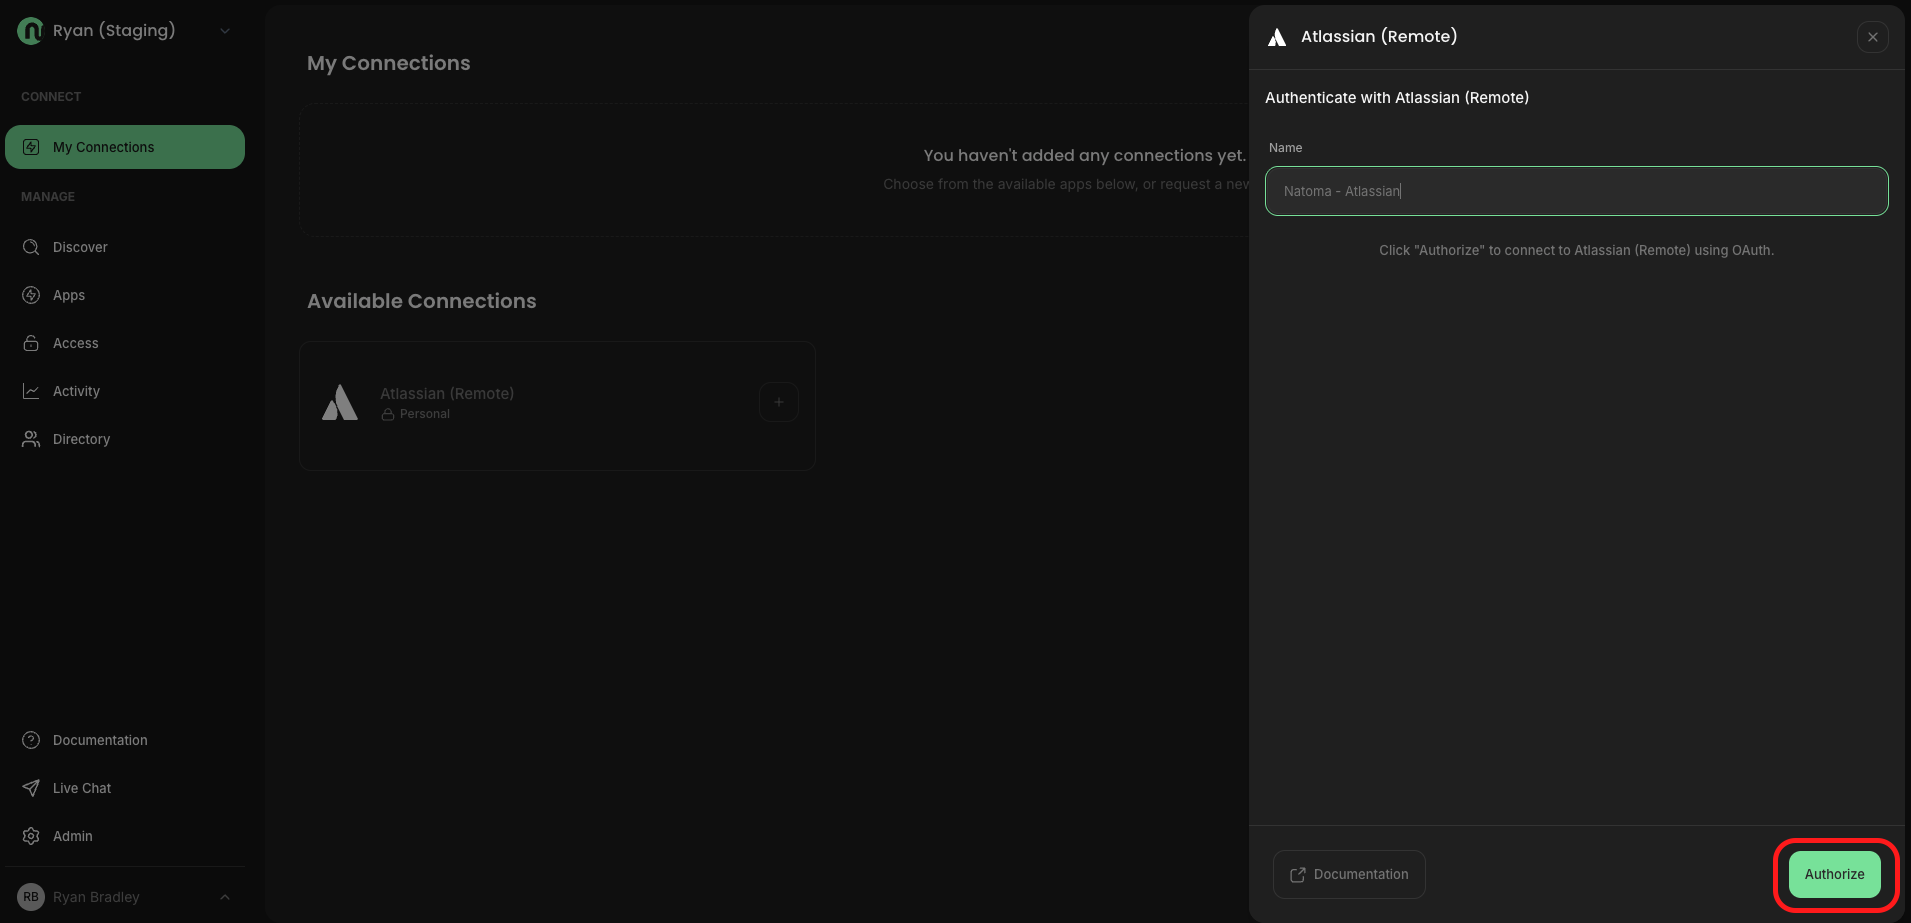
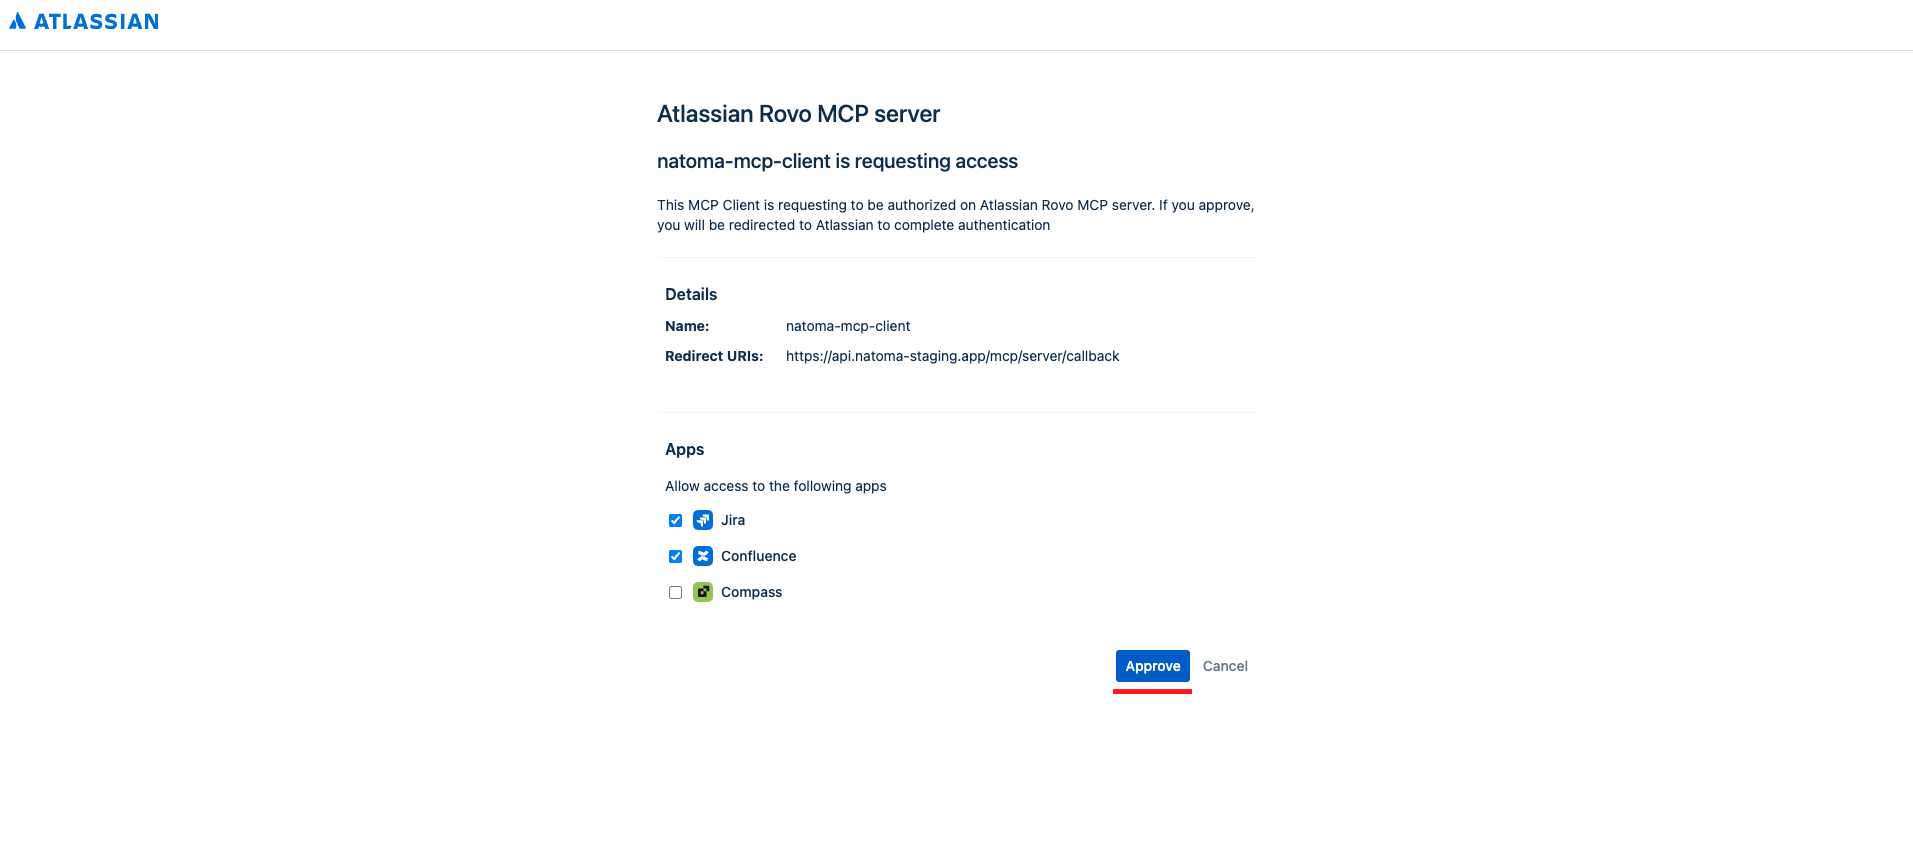
Follow the steps to authorize the connection. Depending on the app, this may require you to click an "Authorize" button or to enter credentials.
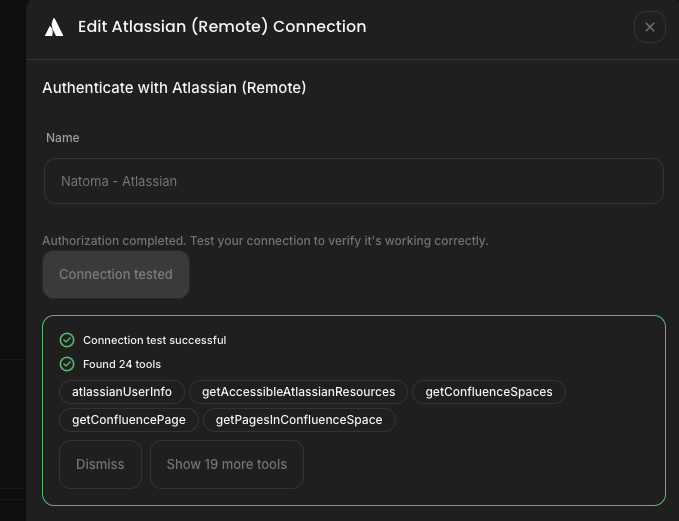
## Step 3: (Optional) Test your connection
Click "Test connection" to validate that a successful connection was established with your app.
## Next steps
Once your connection is created, you need to configure your AI client to use it. See [Configure Your Client](/connect-to-ai/getting-started/configure-client).
# Configure Your Client
Set up your AI client to use Natoma connections
After creating connections, configure your AI client (like Cursor, Claude, or ChatGPT) to use them.
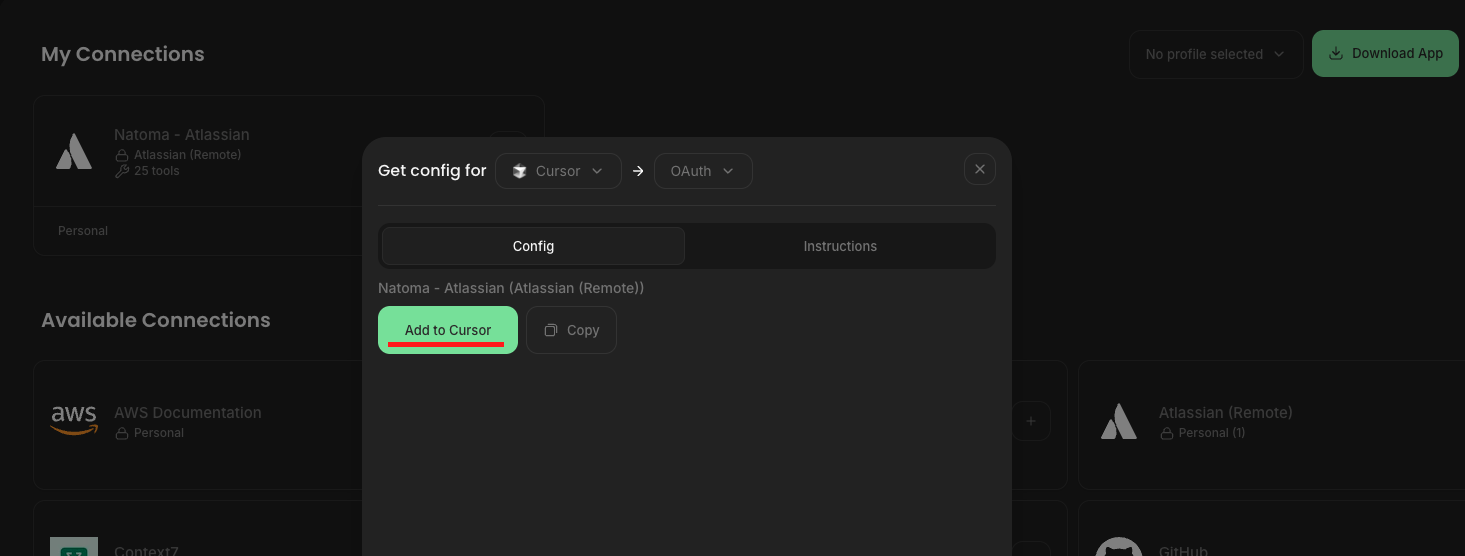
## Step 1: Get your configuration
Click the Get Config button in the top right of your browser.
## Step 2: Select your AI client
Choose your AI client to generate the right configuration for it.
## Step 3: Update your client's configuration
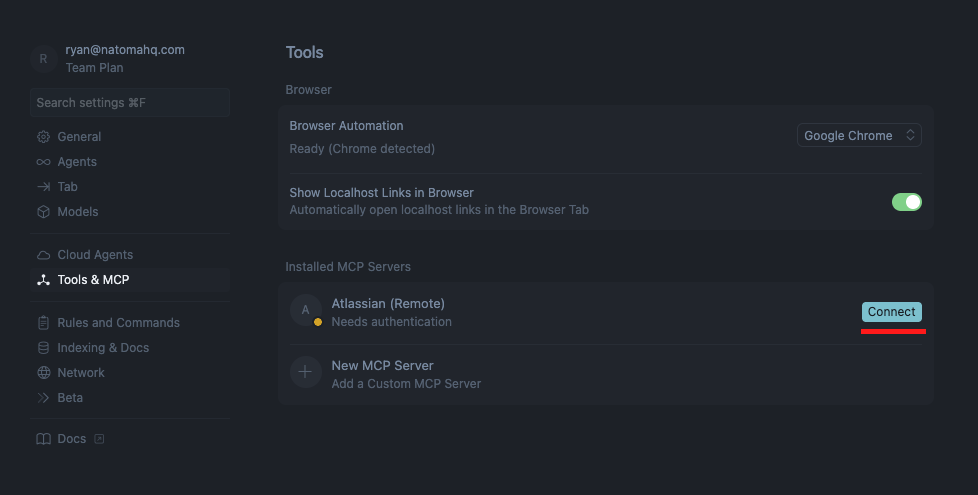
Follow the Instructions tab to update your LLM's configuration.
For example, clicking the **`Add to Cursor`** button will add this to Cursor's `mcp.json` config file.
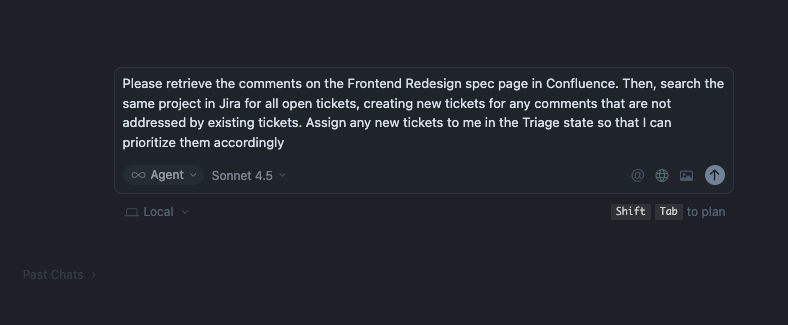
## Step 4: Try it out
Try out a prompt to start building!
# Manage AI Access
# Invite Others to Natoma
Natoma provides the biggest benefit to teams of people, not just one individual. By inviting more users to your Natoma organization, you can help them connect LLMs to their key apps as well as give them access to connections that you manage.
#### Steps
1. Navigate to the **Directory** page
2. Click the **+ Invite Users** button to invite a new user to your organization by email
Natoma also supports as single sign-on and automated provisioning among its [Enterprise Features](/docs/enterprise/secure-access-to-natoma), available to paying customers
# Shared Access to Connections
Users may not be able to connect AI directly to every app. In some cases, the application may not allow them to generate credentials or authorize AI access. In others, they may rely on a shared account or service account for access.
For these situations, Natoma gives admins the ability to create **Managed Connections** - a connection to an app where the credentials are specified by the admin, not the end user. Then, users in Natoma can be granted access to this connection. For example, to democratize access to data, an admin can share a managed connection with read-only access to MongoDB or Snowflake.
#### Steps
1. From the **Apps** page, click the `...` or `+` button beside an app and select “Add a managed connection”
2. Enter a name for the connection and authentication details.
3. Specify the tools that will be available to that connection
Once a managed connection has been created, a user can see it on their **My Connections** page and add it to their LLM’s configuration.
# Distribute Access via Profiles
Setting up connections between AI and key business apps can be repetitive. A **Profile** in Natoma is a named collection of MCP server connections that you can define once and distribute to users, so they spend less time configuring clients and re-authorizing the same apps.
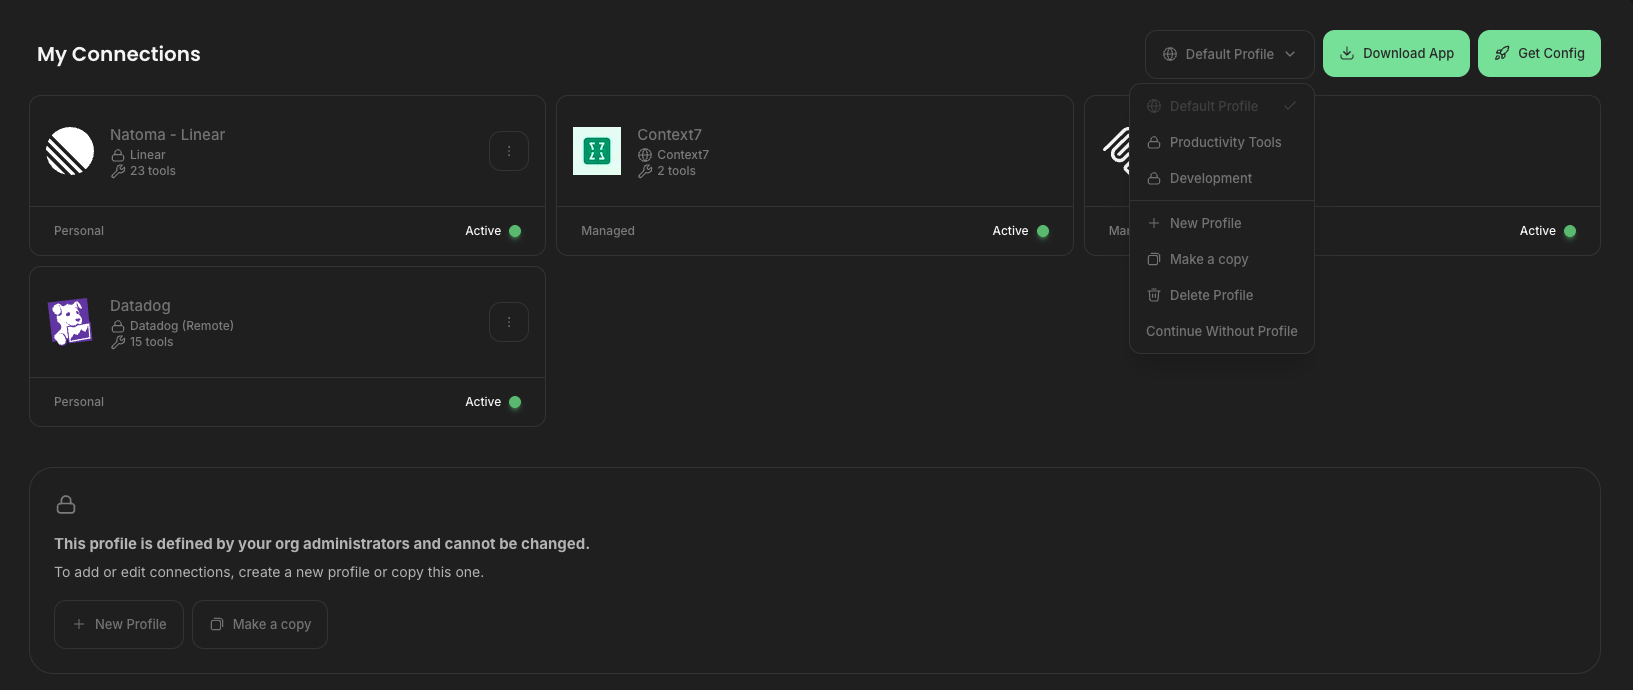
**Managed profiles** are defined by an administrator and are read-only for members: they receive the exact set of connections and options the admin chose. **Personal profiles** are created by individual members (up to five per user) for their own use and remain under their control.
For organizations that have Profiles enabled, any app or tool included in a profile the member is using is available by default. When the profile is updated, members typically only need to refresh their AI client—no extra authorization flow for each change, beyond what the apps require.
## How admins set up a managed profile
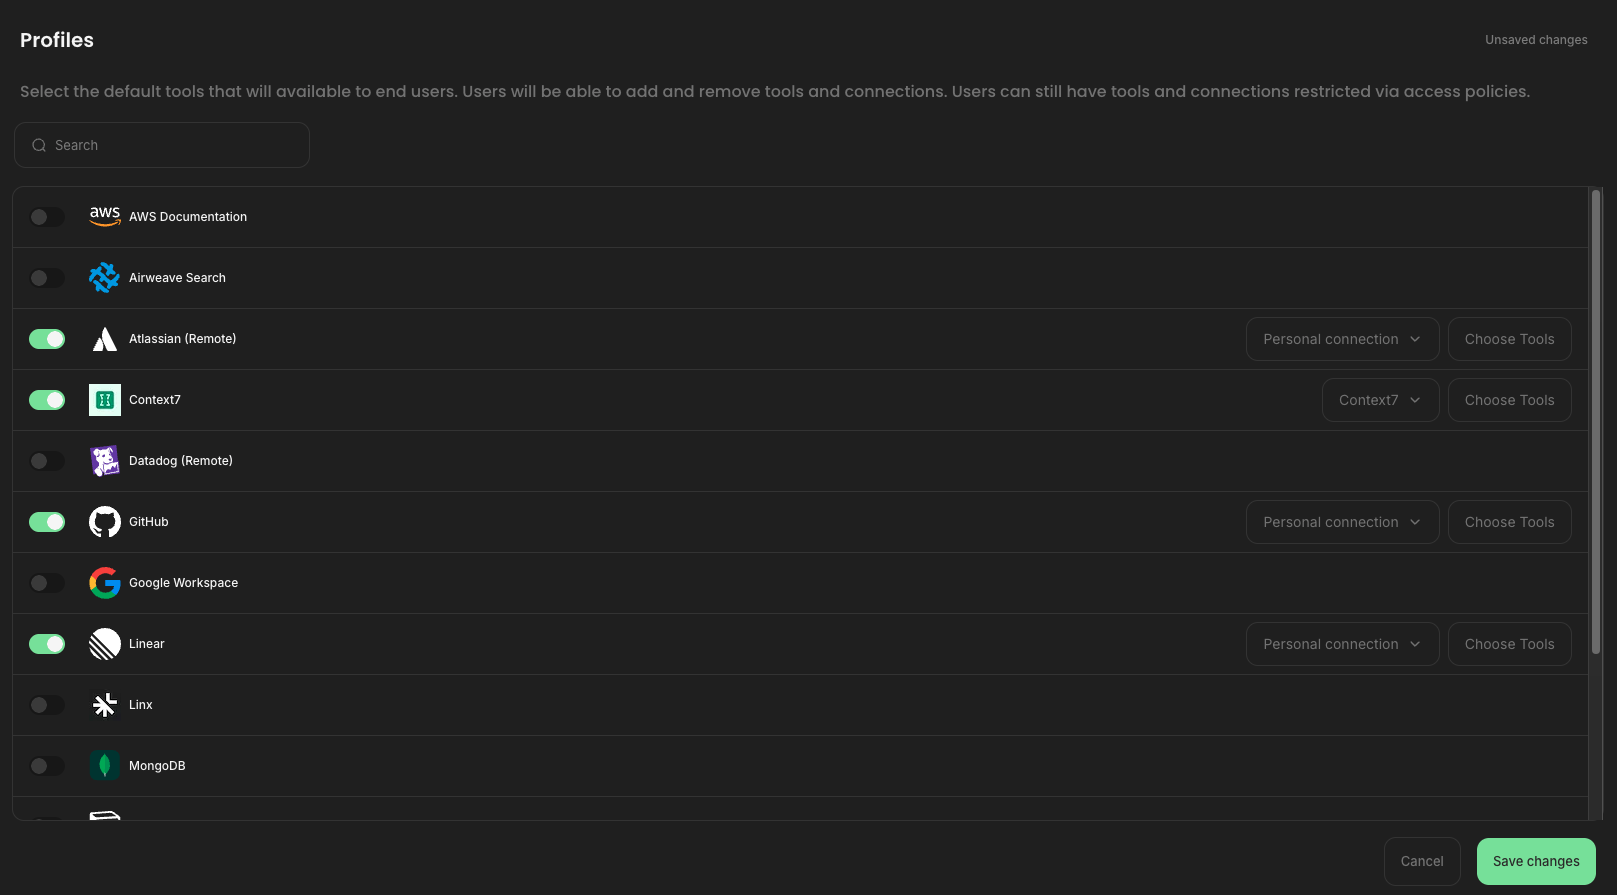
From the **Profiles** page in the sidebar, you choose which MCP servers to include and how each is connected.
#### Step 1: Select the server(s) that should be included in the profile
*Using the green toggle on the left side of the page, select which apps should be included in the profile.*
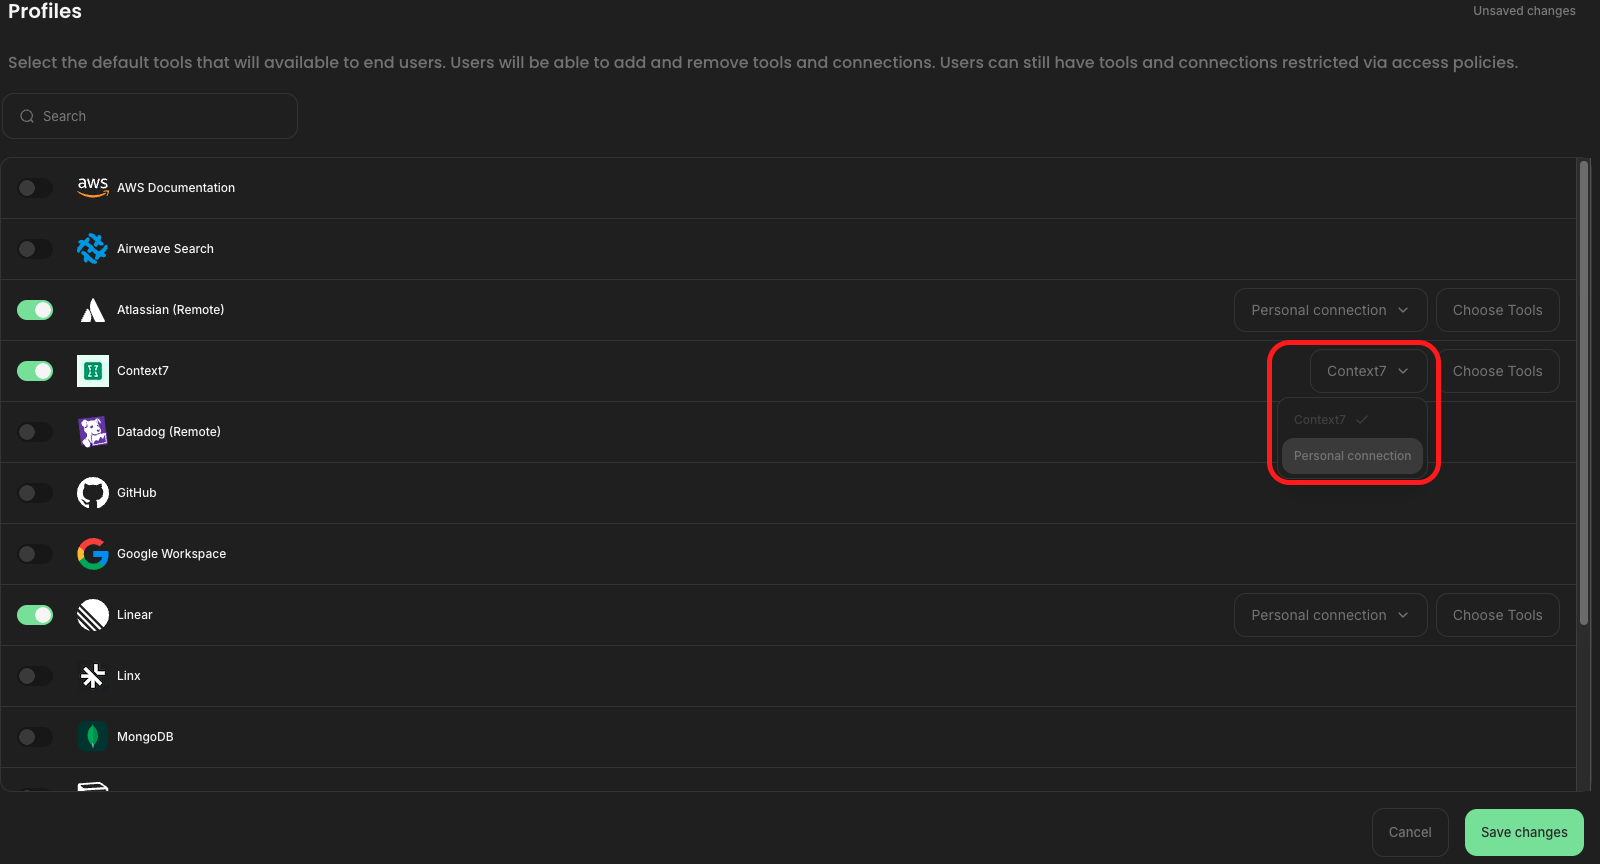
#### Step 2: Choose Managed or Personal connections per server
***Managed** connections use org-wide credentials and settings you configure as the admin, so you can* [*share access*](/docs/manage-ai/shared-access) *across the team. **Personal** connections use each member’s own credentials; you enable the app, and the member completes setup.*
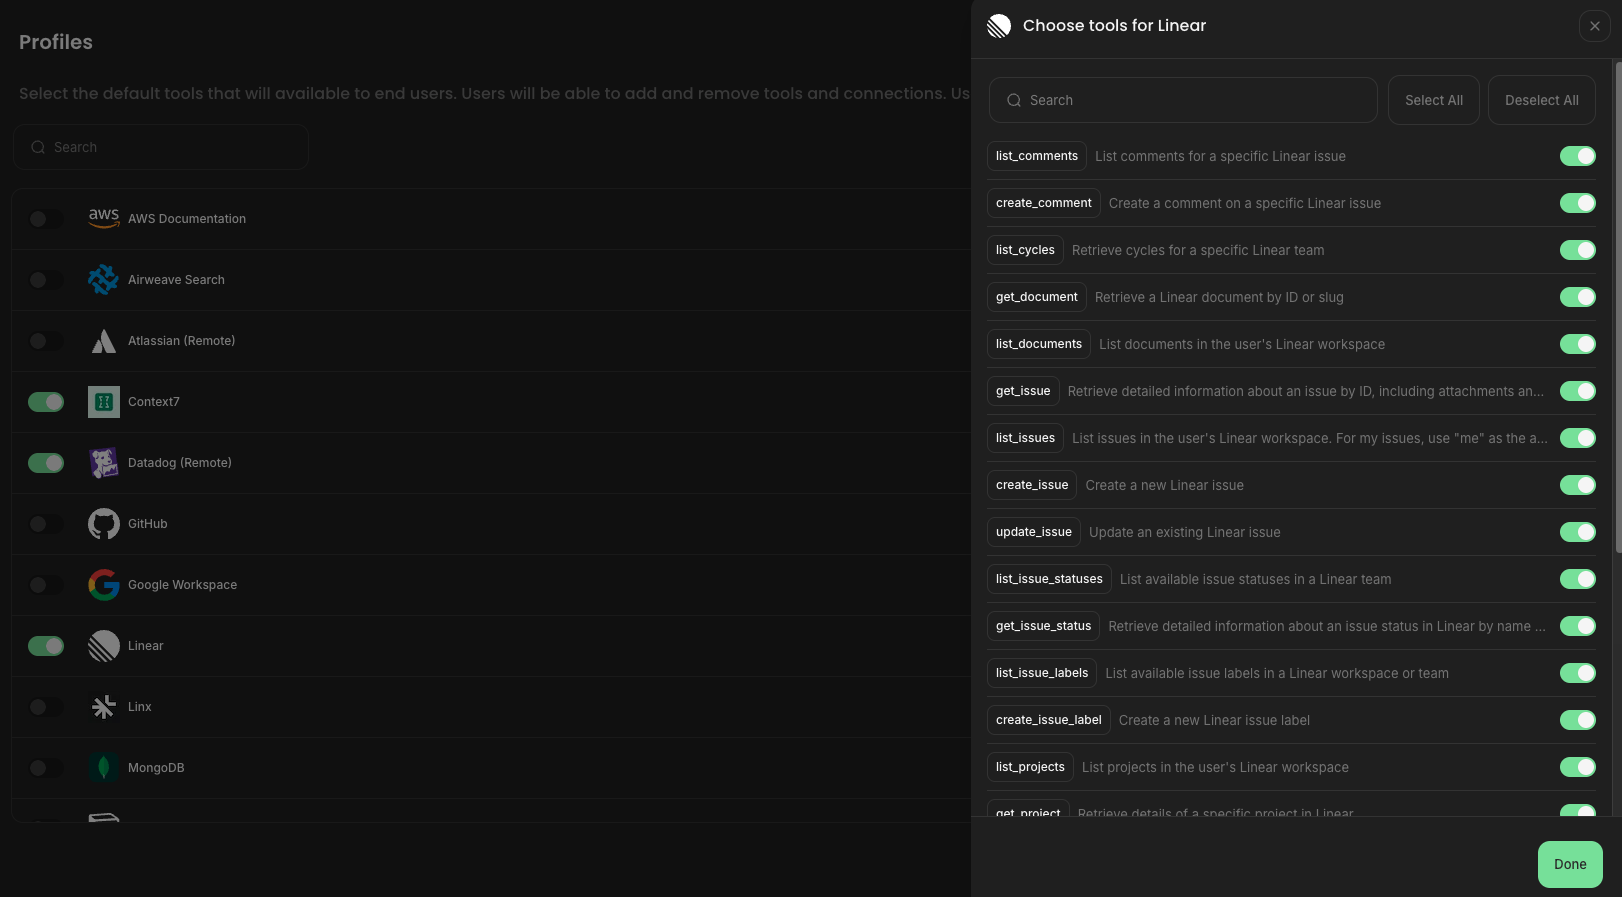
#### Step 3: (Optional) Limit which tools are enabled by default
*All tools your organization allows for an app may be available; you can include only a subset of them in the profile so they are enabled by default for members on that profile.*
*Note:* [*Access control policies*](/docs/enterprise/granular-access) *still govern whether an AI can call a tool. What you include in the profile controls what is on by default in the client.*
#### Step 4: Name and use the profile
*You can maintain multiple profiles for different teams or use cases. Members with access see the resulting **managed profile** and any **personal profiles** they create in the product.*
When you publish a managed profile for the organization, members automatically receive a managed profile with the servers and options you configured (they cannot edit that definition).
## How members use profiles
Members open **My Connections** and use the **Profiles** dropdown to switch between the managed profile(s) their org assigned and up to five personal profiles they build themselves. Switching profiles changes which connection set is active for configuration and for shareable URLs (see below).
## Shareable URLs
**Shareable URLs** are human-readable, slug-based links for MCP server connections and for whole profiles—for example, a path like `https://yourorg.mcp.natoma.app/v2/profile/your-profile/github/mcp` instead of an opaque ID.
They matter because they are **persistent** (the URL does not change when a profile is renamed), **readable** (you can tell what you are installing at a glance), and **shareable**—so you can drop them into onboarding guides, Slack, email, or a team `README` in GitHub.
On **My Connections**, in **Get Config**, you can choose **Individual install URLs** to copy one link per connection, or **Combined profile URL** to copy a single shareable URL for the whole profile. Natoma generates the right format for your selected client, including **Claude Desktop**, **Claude Code**, **Cursor**, **Visual Studio Code**, and other common MCP clients.
When you share a combined profile URL, recipients get the same profile bundle in the format their client expects—no need to juggle several opaque endpoints by hand.
# Discover AI
As AI adoption accelerates within an organization, business lines are often connecting AI directly to the tools & data they use. Many organizations do not know which employees are connecting LLMs to different business applications and, as a result, cannot manage them.
By integrating with endpoint detection and response (EDR) and mobile device management vendors like Crowdstrike, SentinelOne, and Jamf, Natoma discovers what connections to AI already exist. With this information, admins can validate the security of these connections and, if desired, bring them under more formal control.
Steps
1. Navigate to the **Integrations** page
2. Click Add Integration and select your EDR or MDM provider. Supported vendors include CrowdStrike, Jamf, Microsoft Intune, and SentinelOne.
3. Follow Natoma’s instructions to create an integration with the provider, including creation of a client or API key.
Navigate to the Discover page to see all apps which have been connected to AI in your organization and which users have installed the connection
# Enterprise Capabilities
The following features and capabilities are only available to paying customers of Natoma. Please [contact us](mailto:hello@natomahq.com) if you would like to learn more about these capabilities or upgrade to an enterprise version of Natoma.
# Monitor AI
Understanding which actions have been taken by AI and who prompted those actions is a black box. Natoma logs all activity taken by AI including key details like the initiating user or agent, LLM, tool called and more.
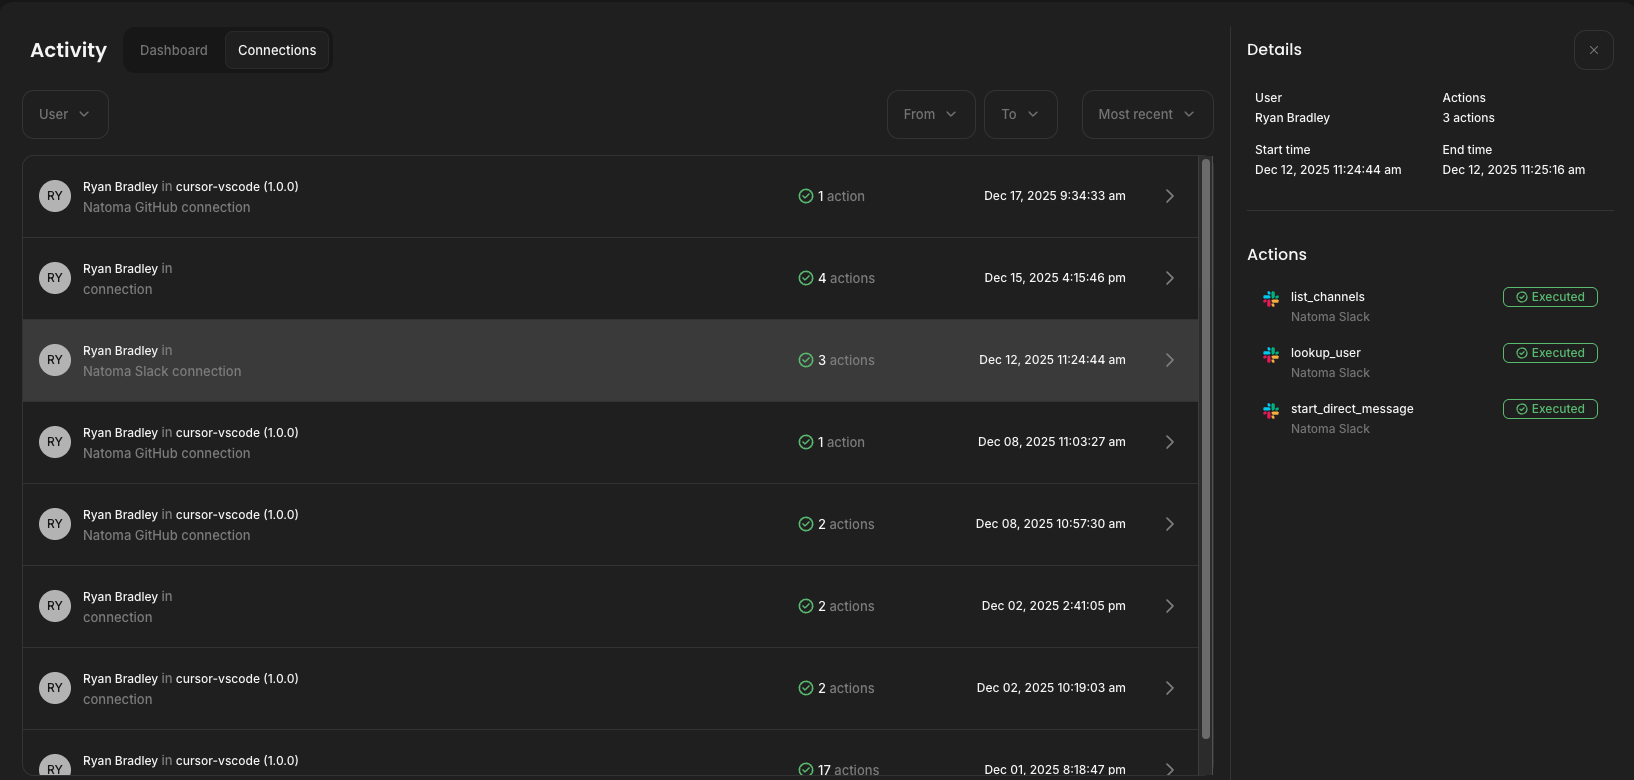
To see more details about activity taken by AI in your organization, navigate to the **Activity** page, which contains two tabs:
#### Dashboard
Gain a high-level understanding of what apps have been installed in your org, what tool calls are being made, and what AI access was discovered outside of Natoma.
#### Connections
A detailed log of every tool call made through Natoma, including the app used, tool called (and arguments included), and the result (e.g. success, policy violation). Tool calls associated wtih the same prompt will be grouped together in the logs, as shown in the screenshot below.
# Granular Access Control
Natoma's policy management capabilities give admins fine-grained control over how AI interacts with business applications. You can define which users can use specific tools, validate data passed to and from AI, and prevent excessive API usage.
## Policy Types
Natoma supports two types of granular policies that can be precisely targeted to specific users, tools, and contexts:
### Access Control
Control which tools users can delegate to AI. For example, you may want to prevent certain users from delegating write access to AI while still allowing read operations. Access policies specify which tools are allowed or blocked for specific users and applications.
### Content Validation
Validate and restrict data that AI can send or receive. Content validation policies allow you to:
* **Validate request arguments** - Inspect and restrict data that AI passes in tool call arguments
* **Validate responses** - Inspect and restrict data returned to AI in responses
This ensures sensitive information is not inadvertently shared with AI or that AI cannot pass inappropriate data to your applications.
## Policy Targeting
Natoma's policies can applied precisely in a given scenario based on multiple criteria:
### User
Apply policies to all users or specific subsets based on:
* **Natoma role** - Member, App Admin, or Admin
* **Identity provider groups** - Group memberships synced from Okta, Microsoft Entra, or other IdPs
* **Profile attributes** - Custom attributes associated with user profiles
### Resource
Apply policies to:
* **Specific tools** - Control access to either all tools or a subset of tools within an application
* **All connections** - Apply to both personal and managed connections
* **Specific connection types** - Target only personal connections or only managed connections
* **Individual managed connections** - Apply policies to specific shared connections
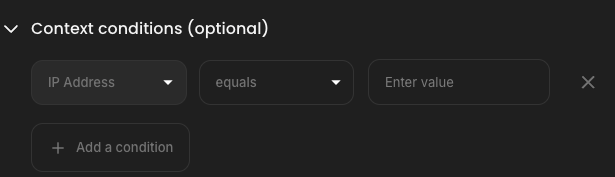
### Contextual conditions
Apply policies based on request context:
* **IP address ranges** - Require requests to originate from specific network locations
* **AI clients** - Restrict which AI tools (Cursor, Claude, ChatGPT, etc.) can invoke specific tools
## Creating a Policy
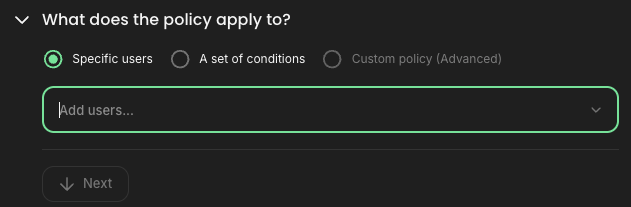
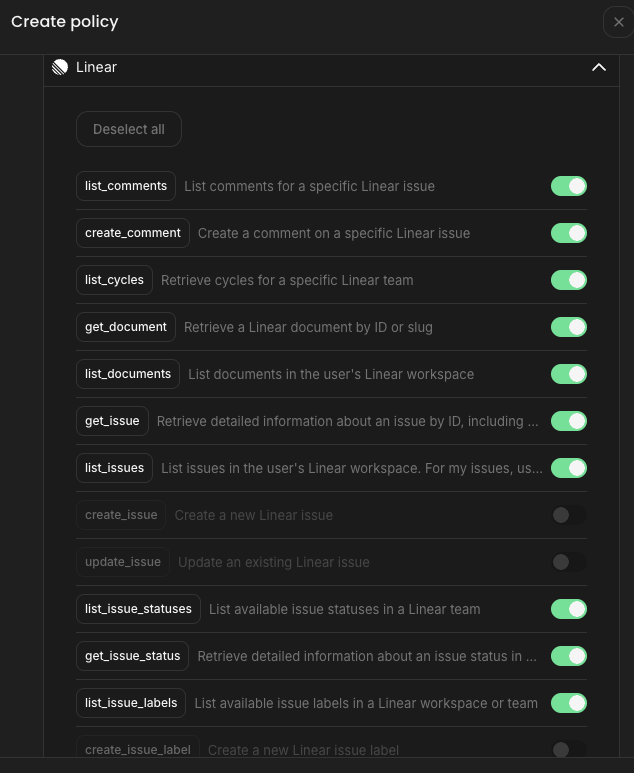
To create a policy, go to the **Access** page in Natoma and click `Add Policy`.
Configure your targeting criteria using the options described above:
1. **Select users** - Choose who the policy applies to
2. **Choose tools** - Specify which tools to allow or block
3. **Set connections** - Indicate which connections are affected
4. **Add conditions** (optional) - Apply contextual constraints like IP ranges or client restrictions
Click "Finish" to save and enable the policy. Until the first policy is created for an app, all tool calls will be allowed.
## Rate Limits
In addition to access and content validation policies, Natoma provides rate limiting to prevent AI from overwhelming applications with excessive requests. Rate limiting is particularly useful when AI hallucinates or enters loops, repeatedly calling the same tools and consuming scarce resources.
You can set limits on the number of requests allowed to an application within:
* A one-hour window
* A 24-hour window
Rate limits are applied per user per application and help protect your systems from runaway AI behavior.
## Policy Evaluation
When AI attempts to call a tool, Natoma evaluates all applicable policies based on:
1. The user making the request
2. The tool being invoked
3. The connection being used
4. The request context (IP, client, etc.)
If any applicable policy blocks the request, the tool call is denied. Content validation policies inspect and potentially modify or reject requests based on the data being passed. Rate limits are checked independently to ensure request volumes remain within configured thresholds.
# Secure Access to Natoma
Natoma offers SAML support for SSO as well as a SCIM client for automated provisioning from a trusted identity provider. For instructions on how to configure SSO or provisioning, see the **SSO** tab on the **Admin** page in your left-hand menu.
## SSO Providers
* [Entra ID](/docs/enterprise/secure-access-to-natoma/entra-sso) — SAML 2.0 SSO and SCIM provisioning via Microsoft Entra (formerly Azure AD)
* [Manage Natoma Role from Entra ID](/docs/enterprise/secure-access-to-natoma/entra-scim-roles) — App role creation and attribute mapping for group-based role provisioning
* [Okta SSO](/docs/enterprise/secure-access-to-natoma/okta-sso) — SAML 2.0 SSO and SCIM provisioning via the Okta Integration Network
* [Manage Natoma Role from Okta](/docs/enterprise/secure-access-to-natoma/okta-scim-groups) — Group-based role provisioning and attribute mapping
# Entra ID
Configure SAML 2.0 SSO and SCIM provisioning for Natoma using Microsoft Entra (formerly Azure AD).
### SAML 2.0 SSO Setup
#### Prerequisites
Before configuring SAML 2.0, ensure you have admin access to both the Microsoft Entra admin center and your Natoma instance with Admin permissions.
#### Supported Features
* SP-initiated SSO (Single Sign-On)
* IdP-initiated SSO
* Just-In-Time provisioning
#### Attribute Statements
In Entra ID the following SAML claim must be added:
| Name | Value |
| ------- | ----------- |
| `email` | `user.mail` |
Make the name of the claim **email**, leave the source as **Attribute** and from the source attribute dropdown select **user.mail** & save
#### Setup Instructions
**Enable SAML in Natoma**
1. In Natoma, navigate to **Admin Settings** and toggle **SAML 2.0** on.
2. Ensure the following two toggles are disabled:
* **Request signed Assertions from the IdP?** — Disabled
* **Request signed Authentication Response from the IdP?** — Disabled
**Create the Application in Entra**
1. Sign into the [Microsoft Entra admin center](https://entra.microsoft.com).
2. Navigate to **Enterprise Applications** → **Add a new application** → **Create your own Application**.
3. Name your application, select **Integrate any other application you don't find in the gallery (Non-gallery)**, and save.
**Configure Single Sign-On**
1. Navigate to **Single sign-on** in the left-hand nav of the app and select **SAML**.
2. Edit the **Basic SAML Configuration** and copy & paste the values from Natoma into the appropriate fields.
**Configure Attribute Claims**
1. Edit the **Attributes & Claims** section and click **Add new claim**.
2. Set the **Name** to `email`, leave **Source** as **Attribute**, and select `user.mail` from the **Source attribute** dropdown.
3. Save the claim.
**Copy Metadata URL to Natoma**
1. Navigate back to the **SAML-based Sign-on** screen using the breadcrumbs at the top.
2. Copy the **Metadata URL** from the **SAML Certificates** section.
3. Paste the Metadata URL into Natoma.
4. Ensure both toggles remain disabled (as set in Step 1).
**Test and Save**
Click **Test Connection** and **Save**. This will log you out and back in via SAML.
***
### SCIM Provisioning Setup
SCIM (System for Cross-domain Identity Management) enables continuous synchronization of users between Microsoft Entra and Natoma, providing automated user lifecycle management.
#### Prerequisites
{% hint style="info" %}
SAML SSO must be fully configured and tested before enabling SCIM provisioning.
{% endhint %}
#### Supported Features
* Create users
* Update user attributes
* Deactivate users
#### Setup Instructions
**Enable SCIM in Natoma**
1. In the Natoma Admin Console, navigate to **Admin** → **SSO**.
2. Toggle on the **SCIM Integration** option.
3. Click **Generate Token**, then immediately copy the token.
{% hint style="warning" %}
You will not be able to view this token again — save it securely before closing.
{% endhint %}
**2. Configure Provisioning in Entra**
1. Back in the Entra admin center, go to the **Provisioning** menu within your SAML app.
2. Click **Connect your application**.
3. Copy and paste the **SCIM URL** and **Token** from Natoma into Entra.
4. Click **Test Connection** to verify the credentials.
**3. Save Configuration in Natoma**
After a successful test in Entra, navigate back to Natoma and click **Save**.
# Manage Natoma Role from Entra ID
Configure SCIM app roles and attribute mapping to provision users with the correct Natoma role from Microsoft Entra ID.
This guide walks Entra ID admins through configuring SCIM provisioning for Natoma so that users are automatically created with the correct role (Admin, AppAdmin, or Member) based on their Entra group assignment.
{% hint style="info" %}
You must be signed in to the Microsoft Entra admin center as an Application Administrator, Cloud Application Administrator, or Global Administrator.
{% endhint %}
***
## Step 1 — Create App Roles in Entra ID
Entra ID uses App Roles to represent the roles that will be provisioned to Natoma. You need to define one App Role per Natoma role value.
1. In the Microsoft Entra admin center, go to **App registrations**.
2. Select your Natoma enterprise application.
3. In the left sidebar, click **App roles**, then click **Create app role**.
4. Create the following three roles (repeat for each):
**Role 1**
| Field | Value |
| -------------------- | ------------ |
| Display name | `Admin` |
| Value | `admin` |
| Allowed member types | Users/Groups |
**Role 2**
| Field | Value |
| -------------------- | ------------ |
| Display name | `AppAdmin` |
| Value | `AppAdmin` |
| Allowed member types | Users/Groups |
**Role 3**
| Field | Value |
| -------------------- | ------------ |
| Display name | `Member` |
| Value | `member` |
| Allowed member types | Users/Groups |
5. Click **Apply** after creating each role.
***
## Step 2 — Assign the Natoma App to an Entra Group
Assign the Natoma enterprise application to each Entra group you want to use for role-based provisioning (e.g. Natoma Admins, Natoma Members).
1. In the Entra admin center, go to **Enterprise applications** and open the Natoma app.
2. In the left sidebar, click **Users and groups**.
3. Click **Add user/group**.
4. Under **Users and groups**, search for and select your group (e.g. `Natoma Admins`).
5. Click **Select a role** and choose the corresponding App Role (e.g. `Admin`).
6. Click **Assign**.
{% hint style="info" %}
Repeat this step for each group/role combination. Every group must have a role selected — users without a role assignment will be skipped during provisioning.
{% endhint %}
***
## Step 3 — Configure the Attribute Mapping for the Role Field
By default, Entra ID does not map the app role assignment to a SCIM role attribute. You need to add this mapping manually.
1. In the Natoma enterprise app, go to **Provisioning** in the left sidebar.
2. Click **Edit attribute mappings**.
3. Expand **Mappings** and click **Provision Microsoft Entra ID Users**.
4. Scroll to the bottom of the attribute list and click **Add New Mapping**.
5. Configure the new mapping as follows:
| Field | Value |
| ---------------- | ----------------------------------------------- |
| Mapping type | Expression |
| Expression | `SingleAppRoleAssignment([appRoleAssignments])` |
| Target attribute | `roles[primary eq "True"].value` |
6. Click **OK**, then click **Save** on the attribute mapping page.
{% hint style="info" %}
`SingleAppRoleAssignment` is recommended when each user will have a single Natoma role. It reads the App Role assigned to the user or their group and writes the role value to the SCIM roles attribute.
{% endhint %}
***
## Step 4 — Enable Automatic Provisioning
Connect Entra ID to Natoma's SCIM endpoint and enable automatic provisioning.
1. In the Natoma enterprise app, go to **Provisioning**.
2. Click **Get started** (or **Edit provisioning** if previously configured).
3. Set the **Provisioning Mode** to **Automatic**.
4. In the **Admin Credentials** section, enter:
* **Tenant URL**: your Natoma SCIM endpoint URL
* **Secret Token**: your Natoma SCIM bearer token
5. Click **Test Connection** to verify, then click **Save**.
6. Under **Settings**, confirm **Scope** is set to **Sync only assigned users and groups**.
7. Click **Start provisioning**.
{% hint style="info" %}
Entra ID syncs on a cycle of approximately 40 minutes. To test immediately, use **Provision on demand** from the Provisioning page and select a specific user.
{% endhint %}
***
## Step 5 — Test the Configuration
1. Add a test user to one of the groups configured in Step 2.
2. In the Natoma enterprise app, go to **Provisioning** and click **Provision on demand**.
3. Search for and select the test user, then click **Provision**.
4. In Natoma, confirm the user appears with the expected role.
{% hint style="warning" %}
If the role field is empty, check the provisioning logs: **Provisioning → View provisioning logs**.
{% endhint %}
***
## Troubleshooting
**User provisioned but role is missing** — Confirm the user's group has a role selected under **Users and groups → Edit assignment**. A missing role selection causes Entra to skip role provisioning.
**Provisioning skipped entirely** — Entra ID skips users not assigned to the app. Ensure the user's group is listed under **Users and groups** with a role selected.
**MultipleGrantsNotSupported error** — This occurs if a user belongs to multiple groups with different roles. Either ensure users are in only one Natoma role group, or contact Natoma support about multi-role handling.
**Sync not reflecting changes** — Trigger an immediate sync via **Provision on demand**, or restart provisioning from the **Provisioning** page.
# Okta SSO
Configure SAML 2.0 SSO and SCIM provisioning for Natoma using the Okta Integration Network (OIN) application.
This guide covers setup for Natoma using the Okta OIN (Okta Integration Network) application, which supports both SAML 2.0 for Single Sign-On and SCIM for user and group provisioning.
***
## SAML 2.0 SSO Setup
### Prerequisites
{% hint style="info" %}
When using SAML as the SSO mode with provisioning, your tenant must be upgraded from a free trial.
{% endhint %}
### Supported Features
* SP-initiated SSO (Single Sign-On)
* IdP-initiated SSO (through [Third-party Initiated Login](https://openid.net/specs/openid-connect-core-1_0.html#ThirdPartyInitiatedLogin))
* Just-In-Time provisioning
### Attribute Statements
The following SAML attributes are supported:
| Name | Value |
| ------- | -------------------------------------- |
| `email` | `user.email` |
| `name` | `user.firstName + " " + user.lastName` |
### SP-Initiated SSO
The sign-in process is initiated from Natoma:
1. From your browser, navigate to the Natoma sign-in page.
2. Enter your Okta email and click **Sign in**, then enter your Okta credentials when prompted.
If your credentials are valid, you are redirected to the Natoma dashboard.
### Setup Instructions
**1. Add the Application in Okta**
1. Log in to your Okta admin account.
2. Navigate to **Applications** and select **Browse App Catalog**.
3. Search for **Natoma** and click **Add Integration**.
**2. Copy your Tenant ID from Natoma**
1. In Natoma, go to **Admin > SSO**.
2. Copy your tenant ID from the Entity ID or ACS URL field.
3. Paste the tenant ID into Okta and click **Done**.
**3. Copy the Metadata URL to Natoma**
1. In Okta, navigate to the **Sign On** tab and copy the **Metadata URL**.
2. Back in Natoma, paste the Metadata URL into the SSO settings.
3. Click **Test SAML**. Once the test passes, click **Update**.
**4. Assign the Application**
In Okta, go to the application, click **Assignments**, and assign the necessary people or groups.
***
## SCIM Provisioning Setup
SCIM (System for Cross-domain Identity Management) enables continuous synchronization of users and groups between Okta and Natoma.
### Prerequisites
{% hint style="info" %}
When using SAML as the SSO mode with provisioning, your tenant must be upgraded from a free trial.
{% endhint %}
### Supported Features
* Create users
* Update user attributes
* Deactivate users
* Import users
* Import groups
* Profile sourcing
* Group push
### Setup Instructions
**1. Enable SCIM in Natoma**
1. In the Natoma Admin Console, navigate to **Admin Settings > SSO** (or Identity Providers).
2. Toggle the option for **SCIM Integration**.
3. Click **Generate Token** and immediately copy the token.
{% hint style="warning" %}
You will not be able to view this token again — save it before closing.
{% endhint %}
**2. Configure API Integration in Okta**
1. In your Okta application, navigate to the **Provisioning** tab.
2. Under **Settings**, go to **Integration** and click **Edit**.
3. Check the **Enable API Integration** box.
4. Paste the generated SCIM token into the API token field.
5. Click **Test API Credentials**, then **Save**.
**3. Enable Provisioning to App**
1. After saving, click **To App** in the settings panel, then click **Edit**.
2. Enable the following provisioning actions:
* **Create Users**
* **Update User Attributes**
* **Deactivate Users**
3. Click **Save**.
**4. Provision Users and Groups**
1. In Okta, go to the application, click **Assignments**, and confirm the users and groups you want to provision are assigned.
2. To push groups, navigate to the **Push Groups** tab, select **By name**, enter the group name, select **Push group memberships immediately**, and click **Save**.
# Manage Natoma Role from Okta
Configure SCIM attribute mapping and group-based role provisioning between Okta and Natoma.
This guide covers how to configure SCIM attribute mapping and group rules to provision users with the correct Natoma roles from Okta.
{% hint style="info" %}
OIN SAML/SCIM setup must be completed before following this guide. See [Okta SSO](/docs/enterprise/secure-access-to-natoma/okta-sso) for setup instructions.
{% endhint %}
***
## Step 1 — Verify or Add the `appuser.role` Attribute
### OIN App Users
{% hint style="info" %}
The `appuser.role` attribute should already exist for OIN app users. Verify it is present and skip to Step 2.
{% endhint %}
1. In Okta Admin, go to **Applications** and open the Natoma app.
2. Click the **Provisioning** tab, then **Go to Profile Editor**.
3. Confirm that `appuser.role` appears in the attribute list.
If it is missing, contact Natoma support — it should be present by default on the OIN app.
### Custom App Users
1. In Okta Admin, go to **Applications** and open your custom Natoma app.
2. Click the **Provisioning** tab > **Go to Profile Editor**.
3. Click **+ Add Attribute** and configure it with the following settings:
| Field | Value |
| ------------------ | -------------------------------------------- |
| Display name | `role` |
| Variable name | `role` |
| External name | `role` |
| External namespace | `urn:ietf:params:scim:schemas:core:2.0:User` |
| Attribute type | `GROUP` |
4. Check the box to **define a list of Role Values** and add the following:
* `Admin`
* `AppAdmin`
* `Member`
{% hint style="info" %}
Setting **Attribute Type** to `GROUP` allows the attribute to be overridden at the group app assignment level.
{% endhint %}
***
## Step 2 — Assign the Natoma App to an Okta Group
Assign the Natoma app to each Okta group you want to use for role provisioning.
1. In Okta Admin, open the Natoma app and go to the **Assignments** tab.
2. Click **Assign > Assign to Groups**.
3. Search for and select the group (e.g., `Natoma Test - Admins`).
4. Click **Assign**, then **Done**.
***
## Step 3 — Set the Role Value on the Group Assignment
After assigning the app to a group, set the value of `appuser.role` for that group. This value will be applied to all users in the group when they are provisioned to Natoma.
1. In the Natoma app, go to **Assignments**.
2. Find the group in the list and click the **edit** (pencil) icon.
3. In the group assignment dialog, locate the **Role** attribute field.
4. Enter the Natoma role value — `admin`, `AppAdmin`, or `member`.
5. Click **Save**.
***
## Step 4 — Configure the Okta to Natoma Profile Mapping
Verify the attribute mapping is configured so that the `appuser.role` value is passed through to Natoma during provisioning.
1. In the Natoma app, go to **Provisioning > To App**.
2. Confirm that **Role** is set to **Map from Okta Profile** (or is included in the attribute list).
3. Verify the mapping expression references `appuser.role`.
4. Click **Save** if any changes were made.
***
## Step 5 — Test the Configuration
1. Add a test user to one of the Okta groups configured above.
2. In Okta, push or provision the user to Natoma (or wait for the next sync).
3. In Natoma, confirm the user appears with the correct role.
{% hint style="warning" %}
If roles are not populating correctly, confirm that the `appuser.role` attribute type is set to `GROUP` and that the mapping in Step 4 is saved.
{% endhint %}
# Custom Apps
#### Overview
In addition to applications hosted in Natoma or by third-party providers, Natoma can also host your own, custom-developed applications. These can be:
1. A repository containing the source code for an MCP server
2. A remote URL specifying an MCP server
3. An API specification (from which to generate an MCP server)
This section describes the various mechanisms to provide access to custom apps in Natoma.
#### Requirements
1. The repository must be a publicly available repository hosted in GitHub or GitLab. At this time, Private repositories and other repository providers are not supported.
2. The MCP servers must support streamable HTTP, and the endpoint must end with “/mcp”
3. The API specification must adhere to OpenAPI Specification (“OAS”).
(Optional) The working directory for building and deploying the server should be provided, in case it is not the root directory of the repository. The build steps and deployment will happen from this provided folder path.
# Repository
Repository-based custom apps can either be deployed from an existing Docker container image or generate one from the repository’s source code.
### Dockerfile
Building using a Dockerfile simplifies the process for deploying MCP servers. The following conditions must be met for using Dockerfile builds
1. Dockerfile:
* The working directory must contain a file named Dockerfile (with no file extension)
* This file must include the full instructions to build the server’s Docker image
2. Host:
* The server must listen to all the interfaces at 0.0.0.0 so that the requests to the server can reach the container. Listening to the localhost interface will not work since the requests can’t be forwarded to the container in that case
3. Port:
* To start correctly, the server must listen on a valid port. This must happen in one of three ways.
* The server should listen on the port defined in the $PORT environment variable (recommended).
* Or, if the Dockerfile specifies an EXPOSE instruction, the server should listen on that port. If there is more than one port mentioned in EXPOSE instruction, the default port 8080 will be used to listen to the server
* By default, the port 8080 is used to forward the requests to the server, so the server should listen on port 8080, if no other port is specified
### Source Code
Natoma supports deploying custom apps from repositories using either NodeJS or Python.
#### NodeJS
**Dependencies**
The working directory must contain a package.json file. By default, npm is used to install the dependencies
1. If the user wants to use yarn for installing the packages, there should be a yarn.lock file in the working directory
2. If the user wants to use pnpm for installing dependencies, there should be a pnpm-lock.yaml file in the working directory
**Build**
The package.json file should contain a `build` script, if there are any necessary build steps
**Start**
The startup command for the server must be one of the following
1. The `package.json` file contains a `start` script, for starting the MCP server
2. There is a Procfile in the working directory, with a command for starting the web server. For example:
```python
web: node build/index.js
```
**Configuration**
The server program should be able to take in the environment variable `$PORT` as input, and the server must listen for requests in that port. Otherwise, the server must listen for requests at port `8080`.
**Optional**
1. Specific versions for node, npm, yarn, pnpm, and other engines can be configured in `package.json`
```
{
// rest of the configuration
// ...
"engines": {
"node": "a.b.c",
"npm": "d.e.f",
"pnpm": "g.h.i",
"yarn": "i.j.k"
}
// ...
// rest of the configuration
}
```
#### Python
**Dependencies**
The dependencies are installed using pip. The working directory must contain a `requirements.txt` file for installing the dependencies.
Other package managers such as uv and conda are not supported currently.
**Build**
No additional required steps
**Start**
In order to start the web server in Python, there must be a Procfile in the working directory with the command to start the web server. The Procfile must contain the command for starting a web server, in the following format:
```python
web: COMMAND
```
For example:
If you are running a WSGI server (such as gunicorn), the Procfile could look like the following
```python
web: gunicorn module:wsgi_app --bind 0.0.0.0:$PORT --forwarded-allow-ips="*"
```
If you are running a ASGI server (such as uvicorn), the Procfile could look like the following
```python
web: uvicorn module:application --host 0.0.0.0 --port $PORT --proxy-headers --forwarded-allow-ips="*"
```
If the application already supports running a ASGI / WSGI web server, the startup command could simply be running the Python file directly as follows:
```
web: python app.py
```
**Configuration**
1. The web server (WSGI or ASGI) must listen to the interface `0.0.0.0` for receiving the requests
2. The web server (WSGI or ASGI) must listen either to the port specified using the `$PORT` environment variable or `8080`
3. The web server should forward attached proxy headers to the web application. This ensures the right protocol is used for any redirects
#### **Code Samples**
**FastMCP**
[FastMCP](https://github.com/jlowin/fastmcp) is one of the standard frameworks for working with model context protocol, and is actively maintained. It is a ASGI web application and can be deployed using an ASGI server such as uvicorn.
**Recommendations:**
1. Use the latest version of FastMCP to have fixes for streamable HTTP servers. At time of writing, the latest version is `v.2.14.3`
2. Use `requirements.txt` to store the dependencies for your MCP server
3. Create a Procfile to define the start command for your MCP server
Example:
The below code snippet describes the creation of a FastMCP application:
```python
from fastmcp import FastMCP
mcp = FastMCP()
application = mcp.streamable_http_app() # ASGI compatible web application
```
\
The corresponding Procfile using uvicorn as the ASGI server would be:
```python
web: uvicorn module:application --host 0.0.0.0 --port $PORT --proxy-headers --forwarded-allow-ips="*"
```
with the following parameter values:
**module:**
* The name of the python module containing the application
**application:**
* The web application created by FastMCP, which supports streamable HTTP
**host:**
* The network interface where the ASGI server binds to for handling HTTP requests. We bind to all network interfaces
**port:**
* The port to listen to for requests
**proxy-headers:**
* To enable parsing of proxy headers (such as X-Forwarded-For, X-Forwarded-Proto, X-Forwarded-Host)
**forwarded-allow-ips:**
* To allow all IPs to send forwarded headers. This is safe because Google Cloud's load balancer is the trusted proxy sending these headers.
For this sample, running the uvicorn ASGI server within code would look as follows:
```python
File: server.py
from fastmcp import FastMCP
import os
import uvicorn
port = os.getenv("PORT", 8080)
mcp = FastMCP()
application = mcp.streamable_http_app(path="/mcp")
if __name__ == "__main__":
uvicorn.run(application, # Web application
host="0.0.0.0", # Bind to all interfaces
port=port, # Use the port from the environment variable
proxy_headers=True, # Enable proxy headers
forwarded_allow_ips="*" # Allow all IPs to forward proxy headers
)
```
The Procfile would be:
```
web: python server.py
```
**Official Python SDK**
The [official Python SDK](https://github.com/modelcontextprotocol/python-sdk) supports the full MCP specification, making it easy to implement MCP servers and clients. It uses the FastMCP library under the hood. It is a ASGI web application and can be deployed using an ASGI server such as uvicorn.
Recommendations:
1. Use the latest version of the python SDK to have fixes for streamable HTTP servers. At time of writing, the latest version is `v.1.25.0`
2. Use requirements.txt to store the dependencies for your MCP server
3. Create a Procfile to define the start command for your MCP server
Consider the following application created using the Python SDK:
```python
from mcp.server.fastmcp import FastMCP
# Create an MCP server
mcp = FastMCP("Demo")
app = mcp.streamable_http_app()
```
The corresponding Procfile would be:
```python
web: uvicorn module:application --host 0.0.0.0 --port $PORT --proxy-headers --forwarded-allow-ips="*"
```
For this sample, running the uvicorn ASGI server within code would look as follows:
```python
File: app.py
import os
from mcp.server.fastmcp import FastMCP
import uvicorn
mcp = FastMCP("Demo") # MCP server instance
app = mcp.streamable_http_app() # The web application
port = os.getenv("PORT", "8080") # Get port value from environment
if __name__ == "__main__":
uvicorn.run(
app, # Web application
host="0.0.0.0", # Listen on all interfaces
port=port, # Port to listen on
forwarded_allow_ips="*", # Allow all IPs to forward proxy headers
proxy_headers=True) # Enable proxy headers for forwarded requests
```
The Procfile would be:
```
web: python app.py
```
**Optional**
A specific Python version can be specified by creating a `.python-version` file in the root directory, with the version number.
# Remote URL
Apps being connected via Natoma must support:
1. Streamable HTTP transport, and the endpoint must end with `/mcp`
2. [Dynamic Client Registration](https://oauth.net/2/dynamic-client-registration/) (per OAuth 2.0)
3. Callbacks received from `https://api.natoma.app/mcp/server/callback`
# Core Concepts
The terms defined below appear regularly throughout Natoma’s product and are helpful to understand when using Natoma.
#### **Applications (MCP Servers)**
**Applications** are external business systems that can be connected to AI clients via protocols like MCP or A2A. These systems expose data or functionality that an AI client, such as an LLM, can leverage. The most common example of an application in Natoma today is an MCP server.
#### **Connections**
**Connections** are instances of an application configured for access by a specific user or group. Connections control how AI clients interact with applications on behalf of a prompting user. There are two types of Connections in Natoma:
* **Managed Connections:** Created and maintained by administrators. Admins configure all credentials and settings required to connect to the Application.
* **Personal Connections:** Enabled by admins but configured by end users. Only the user who creates a personal connection can access it. Admins can allow or disallow personal connections for a given Application.
#### **Profiles**
A **Profile** is a named collection of MCP server connections. A **managed profile** is defined by an admin and distributed to members, who use it in read-only form. A **personal profile** is created by a member for their own use (up to five per user). Profiles make it easy to bundle related tools together and share access through a **single** [**shareable URL**](/docs/manage-ai/profiles#shareable-urls) for an entire set of connections.
#### **Tools**
As defined by MCP, a **Tool** is an executable function exposed to clients by an application. Tools define what functionality is available for a client to invoke, such as a call to a public API. Natoma allows admins to enable or disable Tools at an application level. When disabled for an application, a tool will not be visible to any client connecting to that application via Natoma.
Note: Changing the Tools enabled is only available on a per-application basis. Per Connection configuration is not supported today, but is on Natoma’s near-term roadmap.
#### **AI Clients (LLMs)**
**AI Clients** are the interfaces through which users interact with applications via AI. These include, but are not limited to, agents like ChatGPT, Claude, Cursor, Google Gemini, and custom-built LLM wrappers (e.g., using public APIs or SDKs). Clients act on behalf of users by invoking tools via connections.
#### **Key Relationships**
* An **Application** contains one or more **Connections**.
* A **User** may have access to one or more **Connections**.
* An **AI Client** can leverage **one or more Connections** on behalf of a User.
* A **Connection** exposes **one or more Tools** to a **Client**.
* A **Profile** groups **one or more Connections** (and their tools) for distribution and for shareable, client-specific configuration.
# Overview
Natoma Apps are Model Context Protocol (MCP) servers you can connect to your workspace. Each app extends your agent's capabilities by providing access to external data, APIs, tools, and systems.
## Available Apps
Browse our collection of Official and Community MCP servers, including:
* ☁️ **Cloud platforms** - AWS, Supabase, Neon
* 💻 **Developer tools** - GitHub, GitLab, CircleCI
* 📋 **Project management** - Linear, Asana, Atlassian
* 💬 **Communication** - Slack, Microsoft 365, Zoom
* 🔒 **Security** - CrowdStrike, Datadog, Okta
* And many more!
## How to Browse
### 📋 [Alphabetical](https://docs.natoma.ai/catalog/alphabetical)
Complete A-Z list of all supported apps
### 📂 [By Category](/catalog/browse-by-category)
Organized by use case with collapsible sections. Ideal for discovery based on functionality like Cloud & Infrastructure, Development & DevOps, Project Management, and more.
***
Each app page includes:
* Overview and description
* Configuration parameters
* Step-by-step setup instructions
* Authentication requirements
# Alphabetical
Browse all apps in alphabetical order.
{% hint style="info" %}
**Prefer browsing by use case?** Try [Browse by Category](/catalog/browse-by-category) for organized sections.
{% endhint %}
***
## A
* [Airtable](/apps/airtable) - Flexible database platform
* [Airweave Search](/apps/airweave-search) - Vector search and knowledge management
* [Amplitude](/apps/amplitude) - Product analytics platform
* [Apiiro](/apps/apiiro) - Application security platform
* [Asana](/apps/asana) - Task and project management
* [Ashby (Natoma)](/apps/ashby) - Applicant tracking system
* [Atlassian](/apps/atlassian) - Jira and Confluence (static auth)
* [Atlassian (Remote)](/apps/atlassian-remote) - Jira and Confluence (OAuth)
* [AWS CloudWatch](/apps/aws-cloudwatch) - Metrics, alarms, and CloudWatch Logs Insights
* [AWS Cost Explorer](/apps/aws-cost-explorer) - Cost analysis and budget monitoring
* [AWS Documentation](/apps/aws-documentation) - AWS service documentation and API references
* [AWS IAM](/apps/aws-iam) - Identity and access management
* [Azure DevOps](/apps/azure-devops) - Repos, pipelines, and work items
## B
* [BigQuery (Remote)](/apps/bigquery-remote) - Google BigQuery via official remote MCP
* [BigQuery (Toolbox)](/apps/genai-toolbox-bigquery) - BigQuery via service-account key
* [Box (Remote)](/apps/box) - Cloud storage and content management
* [Brave Search](/apps/brave) - Privacy-focused search API
* [Buildkite](/apps/buildkite) - Continuous integration and deployment
## C
* [Checkmarx](/apps/checkmarx) - Application security testing
* [ChEMBL](/apps/chembl) - Chemical database and drug discovery
* [Chrome DevTools](/apps/chrome-devtools) - Local Chrome automation via DevTools Protocol
* [CircleCI](/apps/circleci) - Continuous integration and deployment
* [ClickUp](/apps/clickup) - Task and project management
* [Clojure](/apps/clojure) - Local Clojure REPL and project tooling
* [CloudZero](/apps/cloudzero) - Cloud cost intelligence
* [Context7](/apps/context7) - Developer documentation search
* [Context7 (Authenticated)](/apps/context7-oauth) - Authenticated developer documentation search
* [CrowdStrike](/apps/crowdstrike) - Endpoint protection and threat intelligence
* [Cyera DataPort](/apps/cyera-dataport) - Cyera DataPort data via Snowflake
## D
* [DailyMed](/apps/dailymed) - Drug information database
* [Database Universal](/apps/database-universal) - Postgres, MySQL, MariaDB, and Oracle SQL
* [Databricks](/apps/databricks) - Data analytics and ML platform
* [Datadog (Community)](/apps/datadog-community) - Monitoring and observability
* [Datadog (Official)](/apps/datadog-official) - Monitoring and observability
* [DataForSEO](/apps/dataforseo) - SEO and digital marketing data
* [Dovetail](/apps/dovetail) - User research and insights
* [Draw.io](/apps/drawio) - Diagram creation and editing
* [Dropbox](/apps/dropbox) - File storage and collaboration
## E
* [Excalidraw](/apps/excalidraw) - Diagram creation and editing
## F
* [Fetch](/apps/fetch) - Web content retrieval
* [Figma Desktop](/apps/figma-desktop) - Local Figma Desktop integration
* [Filesystem](/apps/filesystem) - Sandboxed local filesystem access
* [Firecrawl](/apps/firecrawl) - Web scraping and crawling
* [Fireflies.ai](/apps/fireflies) - Meeting intelligence
* [Freshservice](/apps/freshservice) - IT service management
* [FullStory Lexicon](/apps/fullstory-lexicon) - FullStory product analytics
## G
* [GenAI Toolbox](/apps/genai-toolbox) - Multi-database access (Google's GenAI Toolbox)
* [GitHub](/apps/github) - Repository management and collaboration
* [GitHub (Local)](/apps/github-stdio) - Local GitHub MCP via gh CLI
* [GitHub (OAuth)](/apps/github-oauth) - Repository management with support for GitHub Apps
* [GitLab](/apps/gitlab) - DevOps platform for source control
* [GitLab (Legacy)](/apps/gitlab-legacy) - GitLab via personal access token (legacy)
* [Glean](/apps/glean) - Enterprise search and knowledge
* [Gmail (Natoma)](/apps/gmail) - Email access and management
* [Gong](/apps/gong) - Revenue intelligence platform
* [Gong (Community)](/apps/gong-community) - Revenue intelligence via API key/secret
* [Google Calendar (Natoma)](/apps/google-calendar) - Calendar management and scheduling
* [Google Calendar (Official)](/apps/google-calendar-v2) - Google's official Calendar MCP
* [Google Chat](/apps/google-chat) - Google's official Chat MCP
* [Google Docs (Natoma)](/apps/google-docs) - Document creation and editing
* [Google Drive (Natoma)](/apps/google-drive) - Natoma-hosted Google Drive integration
* [Google Drive (Official)](/apps/google-drive-v2) - Google's official Drive MCP
* [Google Forms (Natoma)](/apps/google-forms) - Form creation and response retrieval
* [Google People](/apps/google-people) - Google Contacts via People API
* [Google Sheets (Natoma)](/apps/google-sheets) - Spreadsheet management and data operations
* [Google Slides (Natoma)](/apps/google-slides) - Presentation management and editing
* [Google Workspace](/apps/google-workspace) - Gmail, Drive, Calendar, Docs
* [Grafana](/apps/grafana) - Observability dashboards and alerts
* [Graphiti](/apps/graphiti) - Graph data operations
* [Greenhouse](/apps/greenhouse) - Applicant tracking system
## H
* [Harness](/apps/harness) - Continuous delivery platform
* [Honeycomb](/apps/honeycomb) - Observability and tracing
* [Hubspot](/apps/hubspot) - CRM and marketing automation
## I
* [incident.io](/apps/incidentio) - Incident management
## J
* [Jenkins](/apps/jenkins) - Automation server for CI/CD
* [JFrog](/apps/jfrog) - Artifact and security platform
## K
* [Kubernetes](/apps/kubernetes) - Cluster operations via local kubeconfig
## L
* [LaunchDarkly](/apps/launchdarkly) - Feature management
* [Linear](/apps/linear) - Issue tracking and project management
* [Linx Security](/apps/linx) - AI-powered identity security and IGA platform
* [Looker (Toolbox)](/apps/genai-toolbox-looker) - Looker BI platform
## M
* [Microsoft 365](/apps/microsoft365) - Outlook, Teams, OneDrive, SharePoint
* [Microsoft Graph & ARM](/apps/microsoft-graph-and-arm) - Microsoft Graph and Azure Resource Manager
* [Miro](/apps/miro) - Online collaborative whiteboard
* [Miro (Official)](/apps/miro-official) - Online collaborative whiteboard via Miro's official remote MCP
* [Mixpanel](/apps/mixpanel) - Product analytics
* [MongoDB](/apps/mongodb) - Document database platform
## N
* [Neon](/apps/neon) - Serverless Postgres platform
* [NetSuite](/apps/netsuite) - Oracle NetSuite ERP
* [New Relic](/apps/new-relic) - Observability and APM
* [NotebookLM](/apps/notebooklm) - NotebookLM via nlm CLI
* [Notion](/apps/notion) - Workspace for notes and databases
## O
* [Okta](broken://pages/w60SRGnw1pkG4SGhd8lB) - Identity and access management
* [Okta Community](/apps/okta-community) - Okta IAM via API token
* [Oracle DB (Toolbox)](/apps/genai-toolbox-oracledb) - Oracle Database
## P
* [PayPal](/apps/paypal) - Payment processing
* [Perplexity Ask](/apps/perplexity-ask) - AI-powered search and research
* [Pinecone MCP](/apps/pinecone) - Vector database for semantic search
* [Playwright](/apps/playwright-local) - Browser automation
* [PostgreSQL (Toolbox)](/apps/genai-toolbox-postgres) - PostgreSQL database
* [Power BI](/apps/power-bi) - Microsoft Power BI
* [Prisma](/apps/prisma) - Database ORM
* [Prometheus](/apps/prometheus) - AWS Managed Prometheus PromQL
* [PubChem](/apps/pubchem) - Chemical database and research
* [PubMed](/apps/pubmed) - Biomedical literature database
## R
* [Redis](/apps/redis) - In-memory data structure store
* [Resend](/apps/resend) - Email API
## S
* [SailPoint](/apps/sailpoint) - Identity governance
* [Salesforce](/apps/salesforce) - CRM platform
* [Salesforce (Remote)](/apps/salesforce-remote) - Salesforce CRM via remote MCP
* [Scalr](/apps/scalr) - Terraform automation
* [Select Star](/apps/select-star) - Data discovery and catalog
* [Semgrep](/apps/semgrep) - Static code analysis and security
* [Sentry](/apps/sentry) - Error tracking and performance monitoring
* [SequentialThinking](/apps/sequentialthinking) - Structured reasoning
* [ServiceNow](/apps/servicenow) - IT service management platform
* [ServiceNow (Remote)](/apps/servicenow-remote) - ServiceNow ITSM via remote MCP
* [Slack (Community)](/apps/slack-next) - Team messaging (OAuth)
* [Slack (Official)](/apps/slack-remote) - Team messaging via remote MCP
* [Slack Community](/apps/slack-community) - Natoma-hosted Slack community server
* [SmartBear](/apps/smartbear) - API testing and monitoring
* [Snowflake](/apps/snowflake) - Snowflake Cortex Agents via official MCP
* [Sonarqube](/apps/sonarqube) - Code quality and security analysis
* [Sourcebot](/apps/sourcebot) - Code search across repositories
* [Spacelift](/apps/spacelift) - Infrastructure management platform
* [Spinach](/apps/spinach) - Meeting intelligence
* [Splunk](/apps/splunk) - Splunk Cloud search and analytics
* [Star Wars](/apps/star-wars) - Star Wars universe data
* [Statsig](/apps/statsig) - Feature management and experimentation
* [Stripe](/apps/stripe) - Payment platform
* [Supabase](/apps/supabase) - Open-source Firebase alternative
* [Supernova.io](/apps/supernova) - Design systems platform
## T
* [Tableau](/apps/tableau) - BI and analytics
* [Teradata](/apps/teradata) - Teradata database
* [Time](/apps/time) - Time utilities and timezone operations
## U
* [US PTO](/apps/us-pto) - Patent and trademark search
## W
* [Webflow](/apps/webflow) - Visual web development
* [Wiz](/apps/wiz) - Cloud security platform
* [Wrike](/apps/wrike) - Work management
## Z
* [Zoom](/apps/zoom) - Video conferencing platform
* [Zoom (Remote)](/apps/zoom-remote) - Video conferencing via Zoom remote MCP
# By Category
Browse all apps organized by category and use case. Click any category to expand and see available apps.
☁️ Cloud & Infrastructure
* [AWS CloudWatch](/apps/aws-cloudwatch) - Metrics, alarms, and CloudWatch Logs Insights
* [AWS Cost Explorer](/apps/aws-cost-explorer) - Cost analysis and budget monitoring
* [AWS Documentation](/apps/aws-documentation) - AWS service documentation and API references
* [AWS IAM](/apps/aws-iam) - Identity and access management
* [Azure DevOps](/apps/azure-devops) - Repos, pipelines, and work items
* [CloudZero](/apps/cloudzero) - Cloud cost intelligence
* [Database Universal](/apps/database-universal) - Postgres, MySQL, MariaDB, and Oracle SQL
* [Kubernetes](/apps/kubernetes) - Cluster operations via local kubeconfig
* [MongoDB](/apps/mongodb) - Document database platform
* [Neon](/apps/neon) - Serverless Postgres platform
* [Redis](/apps/redis) - In-memory data structure store
* [Scalr](/apps/scalr) - Terraform automation
* [Spacelift](/apps/spacelift) - Infrastructure management platform
* [Supabase](/apps/supabase) - Open-source Firebase alternative
* [Teradata](/apps/teradata) - Teradata database
💻 Development & DevOps
* [Buildkite](/apps/buildkite) - Continuous integration and deployment
* [CircleCI](/apps/circleci) - Continuous integration and deployment
* [GitHub](/apps/github) - Repository management and collaboration
* [GitHub (Local)](/apps/github-stdio) - Local GitHub MCP via gh CLI
* [GitHub (OAuth)](/apps/github-oauth) - Repository management with support for GitHub Apps
* [GitLab](/apps/gitlab) - DevOps platform for source control
* [GitLab (Legacy)](/apps/gitlab-legacy) - GitLab via personal access token (legacy)
* [Harness](/apps/harness) - Continuous delivery platform
* [Jenkins](/apps/jenkins) - Automation server for CI/CD
* [JFrog](/apps/jfrog) - Artifact and security platform
* [LaunchDarkly](/apps/launchdarkly) - Feature management
* [Semgrep](/apps/semgrep) - Static code analysis and security
* [SmartBear](/apps/smartbear) - API testing and monitoring
* [Sonarqube](/apps/sonarqube) - Code quality and security analysis
* [Sourcebot](/apps/sourcebot) - Code search across repositories
* [Statsig](/apps/statsig) - Feature management and experimentation
📋 Project Management
* [Asana](/apps/asana) - Task and project management
* [Atlassian](/apps/atlassian) - Jira and Confluence (static auth)
* [Atlassian (Remote)](/apps/atlassian-remote) - Jira and Confluence (OAuth)
* [ClickUp](/apps/clickup) - Task and project management
* [incident.io](/apps/incidentio) - Incident management
* [Linear](/apps/linear) - Issue tracking and project management
* [Miro](/apps/miro) - Online collaborative whiteboard
* [Miro (Official)](/apps/miro-official) - Online collaborative whiteboard via Miro's official remote MCP
* [Wrike](/apps/wrike) - Work management
💬 Communication & Collaboration
* [Gmail (Natoma)](/apps/gmail) - Email access and management
* [Google Calendar (Natoma)](/apps/google-calendar) - Calendar management and scheduling
* [Google Calendar (Official)](/apps/google-calendar-v2) - Google's official Calendar MCP
* [Google Chat](/apps/google-chat) - Google's official Chat MCP
* [Google People](/apps/google-people) - Google Contacts via People API
* [Microsoft 365](/apps/microsoft365) - Outlook, Teams, OneDrive, SharePoint
* [Slack (Community)](/apps/slack-next) - Team messaging (OAuth)
* [Slack (Official)](/apps/slack-remote) - Team messaging via remote MCP
* [Slack Community](/apps/slack-community) - Natoma-hosted Slack community server
* [Spinach](/apps/spinach) - Meeting intelligence
* [Zoom](/apps/zoom) - Video conferencing platform
* [Zoom (Remote)](/apps/zoom-remote) - Video conferencing via Zoom remote MCP
🔒 Security & Monitoring
* [Apiiro](/apps/apiiro) - Application security platform
* [Checkmarx](/apps/checkmarx) - Application security testing
* [CrowdStrike](/apps/crowdstrike) - Endpoint protection and threat intelligence
* [Datadog (Community)](/apps/datadog-community) - Monitoring and observability
* [Datadog (Official)](/apps/datadog-official) - Monitoring and observability
* [Grafana](/apps/grafana) - Observability dashboards and alerts
* [Honeycomb](/apps/honeycomb) - Observability and tracing
* [Linx Security](/apps/linx) - AI-powered identity security and IGA platform
* [Microsoft Graph & ARM](/apps/microsoft-graph-and-arm) - Microsoft Graph and Azure Resource Manager
* [New Relic](/apps/new-relic) - Observability and APM
* [Okta](broken://pages/w60SRGnw1pkG4SGhd8lB) - Identity and access management
* [Okta Community](/apps/okta-community) - Okta IAM via API token
* [Prometheus](/apps/prometheus) - AWS Managed Prometheus PromQL
* [SailPoint](/apps/sailpoint) - Identity governance
* [Sentry](/apps/sentry) - Error tracking and performance monitoring
* [Splunk](/apps/splunk) - Splunk Cloud search and analytics
* [Wiz](/apps/wiz) - Cloud security platform
📈 Sales & Marketing
* [Ashby (Natoma)](/apps/ashby) - Applicant tracking system
* [Gong](/apps/gong) - Revenue intelligence platform
* [Gong (Community)](/apps/gong-community) - Revenue intelligence via API key/secret
* [Greenhouse](/apps/greenhouse) - Applicant tracking system
* [Hubspot](/apps/hubspot) - CRM and marketing automation
* [Salesforce](/apps/salesforce) - CRM platform
* [Salesforce (Remote)](/apps/salesforce-remote) - Salesforce CRM via remote MCP
📊 Analytics & Data
* [Amplitude](/apps/amplitude) - Product analytics platform
* [BigQuery (Remote)](/apps/bigquery-remote) - Google BigQuery via official remote MCP
* [BigQuery (Toolbox)](/apps/genai-toolbox-bigquery) - BigQuery via service-account key
* [Cyera DataPort](/apps/cyera-dataport) - Cyera DataPort data via Snowflake
* [FullStory Lexicon](/apps/fullstory-lexicon) - FullStory product analytics
* [GenAI Toolbox](/apps/genai-toolbox) - Multi-database access (Google's GenAI Toolbox)
* [Looker (Toolbox)](/apps/genai-toolbox-looker) - Looker BI platform
* [Mixpanel](/apps/mixpanel) - Product analytics
* [Oracle DB (Toolbox)](/apps/genai-toolbox-oracledb) - Oracle Database
* [PostgreSQL (Toolbox)](/apps/genai-toolbox-postgres) - PostgreSQL database
* [Power BI](/apps/power-bi) - Microsoft Power BI
* [Snowflake](/apps/snowflake) - Snowflake Cortex Agents via official MCP
* [Tableau](/apps/tableau) - BI and analytics
🔍 Search & Data
* [Airweave Search](/apps/airweave-search) - Vector search and knowledge management
* [Brave Search](/apps/brave) - Privacy-focused search API
* [Context7](/apps/context7) - Developer documentation search
* [Context7 (Authenticated)](/apps/context7-oauth) - Authenticated developer documentation search
* [DataForSEO](/apps/dataforseo) - SEO and digital marketing data
* [Glean](/apps/glean) - Enterprise search and knowledge
* [Perplexity Ask](/apps/perplexity-ask) - AI-powered search and research
* [Pinecone MCP](/apps/pinecone) - Vector database for semantic search
* [Select Star](/apps/select-star) - Data discovery and catalog
💼 Business Operations
* [Airtable](/apps/airtable) - Flexible database platform
* [Box (Remote)](/apps/box) - Cloud storage and content management
* [Dovetail](/apps/dovetail) - User research and insights
* [Dropbox](/apps/dropbox) - File storage and collaboration
* [Freshservice](/apps/freshservice) - IT service management
* [Google Docs (Natoma)](/apps/google-docs) - Document creation and editing
* [Google Drive (Natoma)](/apps/google-drive) - Natoma-hosted Google Drive integration
* [Google Drive (Official)](/apps/google-drive-v2) - Google's official Drive MCP
* [Google Forms (Natoma)](/apps/google-forms) - Form creation and response retrieval
* [Google Sheets (Natoma)](/apps/google-sheets) - Spreadsheet management and data operations
* [Google Slides (Natoma)](/apps/google-slides) - Presentation management and editing
* [Google Workspace](/apps/google-workspace) - Gmail, Drive, Calendar, Docs
* [NetSuite](/apps/netsuite) - Oracle NetSuite ERP
* [Notion](/apps/notion) - Workspace for notes and databases
* [ServiceNow](/apps/servicenow) - IT service management platform
* [ServiceNow (Remote)](/apps/servicenow-remote) - ServiceNow ITSM via remote MCP
* [Webflow](/apps/webflow) - Visual web development
💳 Payments & Finance
* [PayPal](/apps/paypal) - Payment processing
* [Stripe](/apps/stripe) - Payment platform
🎨 Design & Creative
* [Draw.io](/apps/drawio) - Diagram creation and editing
* [Excalidraw](/apps/excalidraw) - Diagram creation and editing
* [Figma Desktop](/apps/figma-desktop) - Local Figma Desktop integration
* [Supernova.io](/apps/supernova) - Design systems platform
🛠️ Specialized Tools
* [ChEMBL](/apps/chembl) - Chemical database and drug discovery
* [Chrome DevTools](/apps/chrome-devtools) - Local Chrome automation via DevTools Protocol
* [Clojure](/apps/clojure) - Local Clojure REPL and project tooling
* [DailyMed](/apps/dailymed) - Drug information database
* [Databricks](/apps/databricks) - Data analytics and ML platform
* [Fetch](/apps/fetch) - Web content retrieval
* [Filesystem](/apps/filesystem) - Sandboxed local filesystem access
* [Firecrawl](/apps/firecrawl) - Web scraping and crawling
* [Fireflies.ai](/apps/fireflies) - Meeting intelligence
* [Graphiti](/apps/graphiti) - Graph data operations
* [NotebookLM](/apps/notebooklm) - NotebookLM via nlm CLI
* [Playwright](/apps/playwright-local) - Browser automation
* [Prisma](/apps/prisma) - Database ORM
* [PubChem](/apps/pubchem) - Chemical database and research
* [PubMed](/apps/pubmed) - Biomedical literature database
* [Resend](/apps/resend) - Email API
* [SequentialThinking](/apps/sequentialthinking) - Structured reasoning
* [Star Wars](/apps/star-wars) - Star Wars universe data
* [Time](/apps/time) - Time utilities and timezone operations
* [US PTO](/apps/us-pto) - Patent and trademark search
# Contact Us
If you have any questions about Natoma or any of our products, please reach out directly to your Natoma representative. Alternatively, you can reach us through the `Live Chat` in the Natoma product or [our Discord server](https://discord.gg/sEcbDNJg3s).
# Model Context Procotol
Model Context Protocol (MCP) functions as a standardized communication framework that enables AI applications to seamlessly access and utilize external data sources. This open protocol establishes consistent methods for context integration between Large Language Models (LLMs) and various information repositories.
MCP serves as the technological equivalent of a universal connector in the AI ecosystem, similar to how standardized ports revolutionized hardware connectivity. By implementing this protocol, developers can significantly enhance their AI applications' contextual awareness without creating custom integration solutions for each data source.
# MCP Hosts/Clients
Programs like Claude Desktop, IDEs, or AI tools that want to access data through MCP. They also host MCP clients that are Protocol clients that maintain 1:1 connections with servers
# MCP Servers
Lightweight programs that each expose specific capabilities through the standardized Model Context Protocol. Natoma hosts/manages these servers via Natoma MCP Service via Server Registry
# Gateway
It is a tool that facilitates communication between clients and Natoma MCP Service using the Model Context Protocol (MCP)
* Connect directly to our Natoma's collection of MCP servers
* Access multiple services through a single endpoint
* Integrate external tools and data sources seamlessly
* Enhance AI capabilities with verified and secure servers
# Server Registry
Natoma is curating and maintaining a growing collection of high-quality MCP servers that extend AI capabilities through various integrations and services. Our directory includes:
* MongoDB Atlas
* Resend
* MotherDuck
* Perplexity (Perplexity Ask)
* Supabase (PostgREST)
* Square
* GitLab
* GitHub
* ServiceNow
* Slack
* Okta
* Datadog
* Stripe
We're constantly adding new servers. Need something specific? [Contact us](mailto:hello@natoma.id)
# Old Getting Started
# All Apps
Complete reference of all apps available on Natoma.
{% hint style="info" %}
**Better way to browse:**\
[**Browse by Category**](/catalog/browse-by-category) - Organized by use case with collapsible sections
{% endhint %}
## About These Pages
Each server page includes:
* Overview and description
* Authentication type and requirements
* Configuration parameters
* Step-by-step setup instructions
* Source information (Official/Community)
***
**Tip:** Most users prefer to [Browse by Category](/catalog/browse-by-category) for easier navigation.
# Airtable
**Type:** Community
**Source Type:** Repository
**Source:** [GitHub](https://github.com/domdomegg/airtable-mcp-server)
**Description:** Integrates with Airtable's flexible database platform to provide programmatic access to bases, tables, and records. Enables Claude to query records, create and update entries, manage table schemas, handle attachments and linked records, and perform bulk operations across Airtable's collaborative database environment.
**Configuration Parameters:**
* **Airtable Personal Access Token** \* - Token for authenticating with Airtable API
* **Airtable Base ID** - Specific base to connect to (optional)
**Setup Steps:**
1. Log in to your Airtable account at
2. Navigate to
3. Click "Create new token"
4. Provide a name for the token (e.g., "Airtable MCP Integration")
5. Under "Scopes", select the appropriate permissions:
* data.records:read - to read records
* data.records:write - to create/update records
* schema.bases:read - to read base schemas
6. Under "Access", select the specific bases to grant access to
7. Click "Create token"
8. Copy the generated token immediately (it will not be shown again)
9. Provide the Personal Access Token to Natoma
# Airweave Search
**Type:** Community
**Source Type:** Repository
**Source:** [GitHub](https://github.com/airweave-ai/airweave)
**Description:** Airweave Search MCP server provides AI assistants with access to Airweave's vector search and knowledge management capabilities. It enables semantic search, document retrieval, and intelligent information discovery across indexed content collections.
**Configuration Parameters:**
* **Airweave API Key** \* - API key for authentication
* **Airweave Collection ID** \* - Collection identifier
**Setup Steps:**
1. Log in to your Airweave account
2. Navigate to Dashboard → API Settings
3. Generate a new API token or key
4. Copy the token for configuration
5. Ensure your account has appropriate permissions for Airweave API access
***
# Amplitude
Connect AI assistants to Amplitude analytics with OAuth.
**Type:** Official
**Source Type:** Remote URL
**Source:**
**Description:** Amplitude MCP server provides AI assistants with access to Amplitude's product analytics platform. It enables querying charts, dashboards, cohorts, experiments, and event properties, as well as creating new charts, dashboards, notebooks, and experiments via natural language.
***
## Setup
No setup required. Click **Authorize** in your Natoma workspace to connect.
# Apiiro
Connect AI assistants to Apiiro's application security platform with OAuth.
{% hint style="warning" %}
**Early Access** — Reach out to your Natoma representative for access.
{% endhint %}
**Type:** Official
**Source Type:** Remote URL
**Source:**
**Description:** Apiiro MCP server provides AI assistants with access to Apiiro's application security platform. It enables querying repositories, findings, and risks, supporting AppSec workflows like triage, prioritization, and reporting.
***
## Setup
No setup required. Click **Authorize** in your Natoma workspace to connect.
# Asana
**Type:** Official
**Source Type:** Remote URL
**Source:**
**Description:** Asana MCP server provides access to the Asana Work Graph, enabling AI assistants to interact with tasks, projects, workspaces, and comments. It offers 42 powerful tools for task operations including creation, updates, deletion, and search across your entire workspace, along with project and team management capabilities.
**Prerequisites:**
* An Asana account with access to the workspace(s) you want to connect
* A Natoma account with Admin or App Admin permissions
## Setup Steps
### Step 1: Create an OAuth App in Asana
1. Go to the [Asana developer console](https://app.asana.com/0/my-apps) and sign in.
2. Click **Create new app**.
3. Enter a name for your app (e.g., "Natoma MCP Client").
4. Select **MCP app** as the app type.
5. Click **Create app**.
6. Once created, copy your app's **Client ID** and **Client Secret** — you'll need them in Step 4.
### Step 2: Configure Your Redirect URL
1. In the left sidebar of your app, click **OAuth**.
2. Under **Redirect URLs**, add the following Natoma callback URL:
```
https://api.natoma.app/mcp/server/callback
```
3. Save your changes.
> **Note:** The redirect URL must match exactly between Asana and Natoma — any mismatch will cause authentication to fail.
### Step 3: Set Workspace Access
1. In the left sidebar, click **Manage distribution**.
2. Under **Distribution method**, choose one of the following:
* **Specific workspaces** — limits access to selected workspaces (recommended for testing)
* **Any workspace** — allows use across all Asana workspaces in your organization
3. If you selected **Specific workspaces**, add at least one workspace before saving.
4. Click **Save changes**.
> **Note:** If you choose **Specific workspaces** but don't add any, users will see an error: "This app is not available to your Asana workspace or organization."
### Step 4: Connect Asana to Natoma
1. In Natoma, navigate to **Apps** and find **Asana**.
2. Click the **+** icon next to it.
3. Click **Enable Personal Connections**.
4. A dialog will appear prompting for OAuth credentials. Paste in the **Client ID** and **Client Secret** from Step 1.
5. Click **Continue**.
Admin setup is complete. Users will be able to establish personal connections at this point.
***
# Ashby (Natoma)
Connect AI assistants to Ashby ATS using a scoped API key.
{% hint style="warning" %}
**Early Access** — Reach out to your Natoma representative for access.
{% endhint %}
**Type:** Built by Natoma
**Source Type:** Repository
**Description:** Ashby MCP server provides AI assistants with access to Ashby's applicant tracking system. It enables querying candidates, applications, jobs, interviews, and feedback to support recruiting workflows.
**Configuration Parameters:**
* **Ashby API Key** \* (sensitive) - Generated in Ashby under **Admin → API Keys**. Scope it to only the permissions end users should have.
**Setup Steps:**
1. Log in to Ashby as an admin.
2. Navigate to **Admin → API Keys** and click **Create API Key**.
3. Scope the key to the permissions you need (read-only is recommended for most uses).
4. Copy the key — Ashby will not show it again.
5. When creating the connection in Natoma, paste the API key and save.
# Atlassian
**Type:** Community
**Source Type:** Repository
**Source:** [GitHub](https://github.com/sooperset/mcp-atlassian)
**Description:** Atlassian MCP server provides AI assistants with access to both Jira and Confluence through static credential authentication. It enables comprehensive project management, issue tracking, and wiki collaboration capabilities while maintaining self-hosted flexibility for authentication configuration.
**Configuration Parameters:**
* **Confluence URL** - Confluence instance URL (optional). Default: `https://your-company.atlassian.net/wiki`
* **Confluence Username** - Username for authentication (optional)
* **Confluence API Token** - Authentication token for API access (optional)
* **Jira URL** - Jira instance URL (optional). Default: `https://your-company.atlassian.net`
* **Jira Username** - Username for authentication (optional)
* **Jira API Token** - Authentication token for API access (optional)
**Setup Steps:**
1. Log in to your Atlassian account
2. Navigate to Settings → Atlassian account settings → Security → API tokens
3. Generate a new API token or key
4. Copy the token for configuration
5. Ensure your account has appropriate permissions for Atlassian API access
***
# Atlassian (Remote)
**Type:** Official
**Source Type:** Remote URL
**Source:**
**Description:** Atlassian's Remote MCP Server connects Jira tickets and Confluence documentation to AI assistants. It enables teams to summarize work, create issues or pages, perform multi-step actions, and access enterprise knowledge while maintaining data security within permissioned boundaries.
**Configuration Parameters:**
* No additional configuration required (OAuth handled automatically)
**Setup Steps:** Not applicable
***
# AWS CloudWatch
**Type:** Official
**Source Type:** Repository
**Source:** [GitHub](https://github.com/awslabs/mcp/tree/main/src/cloudwatch-mcp-server)
**Description:** AWS CloudWatch MCP server enables AI assistants to query metrics, analyze alarms, and search logs using CloudWatch Logs Insights. It is useful for incident investigation, observability workflows, and on-call triage directly from your AI assistant.
**Configuration Parameters:**
* **AwsAccessKey ID** \* - AWS access key ID for authentication
* **AwsRegion** \* - AWS region for API requests (e.g., `us-east-1`)
* **AwsSecretAccessKey** \* - AWS secret access key for authentication
* **AwsSessionToken** \* - Session token for temporary AWS credentials
* **FastmcpLogLevel** - Logging level for the server (optional). Default: `ERROR`
**Setup Steps:**
1. Log in to the AWS Console and navigate to IAM.
2. Create a new IAM user (or select an existing one) for the MCP server.
3. Attach a policy that grants the following CloudWatch and Logs permissions:
* `cloudwatch:DescribeAlarms`
* `cloudwatch:DescribeAlarmHistory`
* `cloudwatch:GetMetricData`
* `cloudwatch:ListMetrics`
* `logs:DescribeLogGroups`
* `logs:DescribeQueryDefinitions`
* `logs:ListLogAnomalyDetectors`
* `logs:ListAnomalies`
* `logs:StartQuery`
* `logs:GetQueryResults`
* `logs:StopQuery`
4. Generate an Access Key ID and Secret Access Key for the user. For short-lived credentials, also generate a Session Token via AWS STS.
5. Note the AWS region you want to query (e.g., `us-east-1`).
6. Copy the credentials into the Natoma connector configuration.
***
# AWS Cost Explorer
**Type:** Official
**Source Type:** Repository
**Source:** [GitHub](https://github.com/awslabs/mcp)
**Description:** AWS Cost Explorer MCP server provides AI assistants with access to AWS cost and usage data, enabling cost analysis, forecasting, and budget monitoring. It facilitates intelligent financial management and optimization of AWS cloud infrastructure spending through automated reporting and insights.
**Configuration Parameters:**
* **AwsAccessKey ID** \* - AWS access key ID for authentication
* **AwsRegion** \* - AWS region for API requests
* **AwsSecretAccessKey** \* - AWS access key ID for authentication
* **AwsSessionToken** \* - Authentication token for API access
* **FastmcpLogLevel** - Logging level for the server (optional). Default: `INFO`
**Setup Steps:**
1. Log in to AWS Console and navigate to IAM
2. Create a new IAM user or select an existing user
3. Generate access credentials (Access Key ID and Secret Access Key)
4. Optionally create a session token for temporary access
5. Assign appropriate IAM policies for the services you want to access
6. Copy the credentials for configuration
***
# AWS Documentation
**Type:** Official
**Source Type:** Repository
**Source:** [GitHub](https://github.com/awslabs/mcp/tree/main/src/aws-documentation-mcp-server)
**Description:** AWS Documentation MCP server provides AI assistants with access to comprehensive AWS service documentation, API references, and best practices. It enables developers to get accurate, up-to-date information about AWS services without leaving their development environment.
**Configuration Parameters:**
* No configuration required
**Setup Steps:**
1. No API credentials required
2. The server provides access to public AWS documentation
***
# AWS IAM
**Type:** Official
**Source Type:** Repository
**Source:** [GitHub](https://github.com/awslabs/mcp)
**Description:** AWS IAM MCP server enables AI assistants to manage AWS Identity and Access Management resources, including users, roles, policies, and permissions. It provides capabilities for identity governance, access control management, and security compliance workflows within AWS environments.
**Configuration Parameters:**
* **AwsAccessKey ID** \* - AWS access key ID for authentication
* **AwsRegion** \* - AWS region for API requests
* **AwsSecretAccessKey** \* - AWS access key ID for authentication
* **AwsSessionToken** \* - Authentication token for API access
* **FastmcpLogLevel** - Logging level for the server (optional). Default: `INFO`
**Setup Steps:**
1. Log in to AWS Console and navigate to IAM
2. Create a new IAM user or select an existing user
3. Generate access credentials (Access Key ID and Secret Access Key)
4. Optionally create a session token for temporary access
5. Assign appropriate IAM policies for the services you want to access
6. Copy the credentials for configuration
***
# Azure DevOps
Connect AI assistants to Azure DevOps using your Azure CLI credentials.
{% hint style="warning" %}
**Early Access** — Reach out to your Natoma representative for access.
{% endhint %}
**Type:** Community
**Source Type:** Local Package
**Source:** [npm](https://www.npmjs.com/package/@azure-devops/mcp)
**Description:** Azure DevOps MCP server provides AI assistants with access to Azure DevOps Services repositories, pipelines, work items, and pull requests. It runs locally and authenticates using your Azure CLI credentials (`az login`).
***
## Setup
### Prerequisites
The host running the MCP server must have the Azure CLI installed and an authenticated session (`az login`). The server uses the active subscription and identity.
**Configuration Parameters:**
* **ADO Org** \* - Azure DevOps organization name — e.g. for `https://dev.azure.com/contoso`, use `contoso`.
When creating the connection in Natoma, enter the values above.
# BigQuery (Remote)
Connect AI assistants to Google BigQuery using Google's official remote MCP server, hosted at bigquery.googleapis.com/mcp.
{% hint style="warning" %}
**Early Access** — Reach out to your Natoma representative for access.
{% endhint %}
**Type:** Official
**Source Type:** Remote URL
**Source:**
**Description:** BigQuery (Remote) MCP server provides AI assistants with access to Google BigQuery via Google's official remote MCP endpoint. Google hosts the MCP infrastructure at a globally available HTTPS endpoint; access is controlled through Google Cloud IAM, and every tool invocation is logged through Cloud Audit Logs.
***
## Prerequisites
* The **BigQuery API** enabled on the project (`bigquery.googleapis.com`).
* The **`gcloud` CLI** with the `beta` component, or access to Cloud Shell.
* An identity (user or service account) authenticated via `gcloud auth application-default login`.
* The IAM roles listed under **Required IAM Permissions** below.
## Required IAM Permissions
Minimum roles to enable and use the MCP server:
| Role | Purpose |
| -------------------------------------- | ------------------------------------------------- |
| `roles/serviceusage.serviceUsageAdmin` | Required to run `gcloud beta services mcp enable` |
| `roles/mcp.toolUser` | Required to invoke MCP tools |
| `roles/bigquery.jobUser` | Required to run BigQuery query jobs |
| `roles/bigquery.dataViewer` | Required to read table data |
Additional roles for write operations:
| Role | Purpose |
| --------------------------- | ------------------------------------- |
| `roles/bigquery.dataEditor` | Read and write table data |
| `roles/bigquery.dataOwner` | Full control over datasets and tables |
{% hint style="info" %}
**Cross-project setups:** if your AI client authenticates in one project but queries data in another, enable the MCP server on **both** projects, and ensure the authenticating identity has the appropriate roles in the data project.
{% endhint %}
***
## Setup
### Admin Setup (one-time)
#### Step 1: Enable the BigQuery API
In the [Google Cloud Console](https://console.cloud.google.com/), confirm your project is selected, then navigate to **APIs & Services > Library**, search for **BigQuery API**, and click **Enable**. (If it's already enabled, the button reads **Manage** — proceed to Step 2.)
Or, from the CLI:
```shell
gcloud services enable bigquery.googleapis.com \
--project=YOUR_PROJECT_ID
```
#### Step 2: Enable the BigQuery Remote MCP Server
The MCP enable command is a `gcloud beta` feature and does not yet have a dedicated UI in the Cloud Console. The easiest no-install option is **Cloud Shell**, which runs in your browser.
1. In the Google Cloud Console, click the **Activate Cloud Shell** button in the top-right toolbar (the `>_` icon).
2. Run:
```shell
gcloud beta services mcp enable bigquery.googleapis.com \
--project=YOUR_PROJECT_ID
```
3. If prompted to install the `beta` component, confirm with `Y`.
The same command works from a local `gcloud` install.
#### Step 3: Create a Web Application OAuth Client
Natoma is a web-based platform — you need a **Web application** OAuth client (not a Desktop client).
1. In the Google Cloud Console, go to **APIs & Services > Credentials** (or **Google Auth Platform > Clients**).
2. Click **Create Credentials > OAuth client ID**.
3. Set the **Application type** to **Web application**.
4. Give it a descriptive name, e.g. `Natoma BigQuery MCP`.
5. Under **Authorized redirect URIs**, add Natoma's OAuth callback URL:
{% hint style="warning" %}
Use exactly this redirect URI — Google will reject the OAuth flow if it doesn't match.
{% endhint %}
```
https://api.natoma.app/mcp/server/callback
```
6. Click **Create**. Copy the **Client ID** and **Client Secret** immediately — the secret is only shown once. Store them in a secure location.
In Natoma, an admin adds **BigQuery (Remote)** under **Apps** and enters the **Client ID** and **Client Secret**.
### Authorize Your Connection
When prompted while creating the connection in Natoma, click **Authorize** and sign in with the Google account that holds the required BigQuery IAM roles.
***
## Available MCP Tools
| Tool | Description | Read-only |
| ------------------ | --------------------------------------- | --------- |
| `list_dataset_ids` | Lists all datasets in a project | Yes |
| `list_table_ids` | Lists all tables in a dataset | Yes |
| `get_dataset_info` | Returns metadata about a dataset | Yes |
| `get_table_info` | Returns schema and metadata for a table | Yes |
| `execute_sql` | Runs a SQL query and returns results | No |
Read-only tools carry the `mcp.tool.isReadOnly = true` attribute, so you can restrict agents to non-mutating operations via organization policy.
## Limitations
* `execute_sql` does **not** support querying Google Drive external tables.
* Queries have a default timeout of **3 minutes**. Longer queries are canceled.
* The MCP server does not add quotas, but standard **BigQuery API quotas** (e.g. `jobs.Query` rate limits) still apply.
## Troubleshooting
* **"Permission denied" when enabling the MCP server** — ensure the account has `roles/serviceusage.serviceUsageAdmin` on the project.
* **"Forbidden" errors when invoking tools** — confirm that `roles/mcp.toolUser`, `roles/bigquery.jobUser`, and `roles/bigquery.dataViewer` are all granted to the authenticating identity.
* **OAuth flow not completing** — verify the OAuth client's redirect URI matches `https://api.natoma.app/mcp/server/callback` exactly, and that `gcloud auth application-default login` completed successfully.
* **MCP server enabled in the wrong project** — for cross-project setups, re-run the enable command targeting the project where BigQuery resources live.
# BigQuery (Toolbox)
Connect AI assistants to BigQuery via Google's GenAI Toolbox using a service-account key.
{% hint style="warning" %}
**Early Access** — Reach out to your Natoma representative for access.
{% endhint %}
**Type:** Official
**Source Type:** Repository
**Source:** [GitHub](https://github.com/googleapis/genai-toolbox)
**Description:** MCP Toolbox for BigQuery (powered by Google's GenAI Toolbox) provides AI assistants with access to Google BigQuery. It enables listing datasets and tables, inspecting schemas, and running SQL through a service-account key.
**Configuration Parameters:**
* **BigQuery Project** \* - GCP project ID (e.g. `my-gcp-project`).
* **Service Account Key JSON** \* (sensitive) - Full JSON contents of a service-account key with the BigQuery roles you need.
**Setup Steps:**
1. In the Google Cloud Console, select the project that owns the BigQuery data.
2. Navigate to **IAM & Admin → Service Accounts → Create Service Account**, then grant `roles/bigquery.dataViewer` and `roles/bigquery.jobUser` (or a narrower set).
3. From the new account's **Keys** tab, click **Add Key → Create new key**, choose **JSON**, and download the file.
4. When creating the connection in Natoma, paste the JSON contents and the project ID, then save.
# Box (Remote)
**Type:** Official
**Source Type:** Remote URL
**Source:**
**Description:** Box MCP server enables AI assistants to interact with your Box cloud storage and content management platform. It provides secure access to files, folders, and collaboration features while maintaining Box's enterprise-grade security controls and permission model.
**Configuration Parameters:**
* No additional configuration required (OAuth handled automatically)
**Setup Steps:** Not applicable
***
# Brave Search
**Type:** Official
**Source Type:** Repository
**Source:** [GitHub](https://github.com/smithery-ai/reference-servers/tree/main/src/brave-search)
**Description:** Brave Search MCP server integrates Brave's privacy-focused search API with AI assistants, providing web search, local business search, news, image, and video search capabilities. It offers intelligent fallback mechanisms, pagination support, and advanced filtering options while maintaining Brave's privacy-first approach to search.
**Configuration Parameters:**
* **mcp\_transport configuration** - Configuration value (optional)
* **mcp\_port configuration** - Configuration value (optional)
* **mcp\_host configuration** - Configuration value (optional)
**Setup Steps:**
1. Sign up for a Brave Search API account at
2. Navigate to 'API keys' in the dashboard
3. Click 'Add API Key' to generate a new key
4. Copy the generated API key for configuration
5. Note: Free tier allows up to 2,000 queries per month
***
# Buildkite
**Type:** Official
**Source Type:** Remote URL
**Source:**
**Description:** Integrates with Buildkite's continuous integration and deployment platform to provide pipeline management and build automation capabilities. Enables Claude to trigger builds, monitor pipeline status, access build logs and artifacts, manage agents, and analyze CI/CD metrics through Buildkite's comprehensive platform.
**Configuration Parameters:**
* No additional configuration required (OAuth handled automatically)
**Setup Steps:** Not applicable
# Checkmarx
Connect AI assistants to Checkmarx One application security with an API key.
{% hint style="warning" %}
**Early Access** — Reach out to your Natoma representative for access.
{% endhint %}
**Type:** Official
**Source Type:** Remote URL
**Source:** `https://{checkmarxBaseUrl}/api/security-mcp/mcp`
**Description:** Checkmarx One MCP server provides AI assistants with access to your Checkmarx One application security platform. It enables querying scans, projects, vulnerabilities, and findings to support AppSec triage and reporting.
**Configuration Parameters:**
* **Checkmarx Base URL** \* - Admin-supplied. Your Checkmarx One host (e.g. `ast.checkmarx.net`, `eu.ast.checkmarx.net`).
* **Checkmarx One API Key** \* (sensitive) - Your personal Checkmarx One API key — generated in Checkmarx One.
## Setup
### Admin Setup
In Natoma, an admin adds **Checkmarx** under **Apps** and sets the **Checkmarx Base URL** for the org.
### User Setup
1. Log in to Checkmarx One.
2. Navigate to **Settings → Identity & Access Management → API Keys**.
3. Click **Create API Key** and scope it to the permissions you need.
4. Copy the generated key — Checkmarx will not show it again.
5. When creating the connection in Natoma, paste the API key and save.
# ChEMBL
**Type:** Community
**Source Type:** Repository
**Source:** [GitHub](https://github.com/Augmented-Nature/ChEMBL-MCP-Server.git)
**Description:** Provides comprehensive access to the ChEMBL chemical database with 22 specialized tools for drug discovery research, chemical informatics analysis, and bioactivity investigations. Enables Claude to search compounds by name or structure, retrieve detailed molecular properties, find similar compounds using Tanimoto similarity, search biological targets, analyze bioactivity data, and explore drug mechanisms of action directly through ChEMBL's REST API.
**Configuration Parameters:**
* No configuration required
**Setup Steps:** No setup required. The server accesses the public ChEMBL REST API which does not require authentication.
# Chrome DevTools
Drive Chrome via the DevTools Protocol from AI assistants.
**Type:** Official
**Source Type:** Local Package
**Source:** [npm](https://www.npmjs.com/package/chrome-devtools-mcp)
**Description:** Chrome DevTools MCP server provides AI assistants with browser-automation and inspection capabilities backed by the Chrome DevTools Protocol. It runs locally — Chrome must be installed on the host.
***
## Setup
### Prerequisites
Chrome must be installed on the host that runs the MCP server.
**Configuration Parameters:**
* **Channel** (optional) - Chrome variant: `stable` (default), `canary`, `beta`, or `dev`.
When creating the connection in Natoma, enter the values above.
# CircleCI
**Type:** Community
**Source Type:** Repository
**Source:** [GitHub](https://github.com/CircleCI-Public/mcp-server-circleci)
**Description:** CircleCI MCP server enables AI assistants to interact with CircleCI's continuous integration and deployment platform. It provides access to pipeline management, build monitoring, workflow orchestration, and deployment automation for streamlined DevOps workflows.
**Configuration Parameters:**
* **CircleciBase URL** \* - Service instance URL
* **CircleciToken** \* - Authentication token for API access
* **FileOutputDirectory** \* - Configuration value
* **Debug** \* - Configuration value
* **Port** \* - Configuration value
* **Start** \* - Configuration value
**Setup Steps:**
1. Log in to your CircleCI account
2. Navigate to User Settings → Personal API Tokens
3. Generate a new API token or key
4. Copy the token for configuration
5. Ensure your account has appropriate permissions for CircleCI API access
***
# ClickUp
**Type:** Official
**Source Type:** Remote URL
**Source:**
**Description:** Integrates with ClickUp's project management platform to provide comprehensive task, project, and workflow management capabilities. Enables Claude to create and update tasks, manage projects and lists, track time, handle comments and attachments, and access team collaboration features through ClickUp's robust API.
**Configuration Parameters:**
* No additional configuration required (OAuth handled automatically)
**Setup Steps:** Not applicable
**Notes:**
* Users authenticate via ClickUp OAuth during initial connection
* Permissions granted are determined during OAuth authorization
* Access can be revoked at any time from ClickUp settings
* Supports Workspaces, Spaces, Folders, Lists, and Tasks hierarchy
* Official ClickUp MCP server with full platform support
* Documentation:
***
# Clojure
Connect AI assistants to a local Clojure REPL and project tooling.
**Type:** Community
**Source Type:** Local Package
**Source:** [GitHub](https://github.com/bhauman/clojure-mcp)
**Description:** Clojure MCP server provides AI assistants with Clojure-specific tooling: REPL evaluation, namespace introspection, and code-aware editing for Clojure projects. It runs locally and operates against your project on disk.
***
## Setup
### Prerequisites
A Clojure project on the host (with `deps.edn` or `project.clj`) and a working JVM/Clojure CLI.
# CloudZero
Connect AI assistants to CloudZero cloud cost intelligence with OAuth.
{% hint style="warning" %}
**Early Access** — Reach out to your Natoma representative for access.
{% endhint %}
**Type:** Official
**Source Type:** Remote URL
**Source:**
**Description:** CloudZero MCP server provides AI assistants with access to CloudZero's cloud cost intelligence platform. It enables querying cost data, dimensions, and allocations to support FinOps reporting and cost-optimization workflows.
***
## Setup
No setup required. Click **Authorize** in your Natoma workspace to connect.
# Context7
**Type:** Official
**Source Type:** Remote URL
**Source:**
**Description:** Context7 MCP server provides AI assistants with access to up-to-date, version-specific documentation and code examples for popular libraries and frameworks. It dynamically fetches current official documentation to prevent outdated API suggestions, supporting developers with accurate, real-time technical references without tab-switching.
**Configuration Parameters:**
* No configuration required
**Setup Steps:**
1. Optional: Create an account at to get an API key
2. With API key: Higher rate limits and access to private documentation repositories
3. Without API key: Basic rate limits apply, suitable for most use cases
4. No additional setup required - server provides public documentation by default
***
# Context7 (Authenticated)
Connect AI assistants to Context7 documentation with authenticated OAuth.
**Type:** Official
**Source Type:** Remote URL
**Source:**
**Description:** Context7 (Authenticated) MCP server provides AI assistants with access to Context7's up-to-date library and framework documentation. The authenticated variant enables higher request quotas and access to private libraries linked to your Context7 account.
***
## Setup
No setup required. Click **Authorize** in your Natoma workspace to connect.
# CrowdStrike
**Type:** Official
**Source Type:** Repository
**Source:** [GitHub](https://github.com/CrowdStrike/falcon-mcp)
**Description:** CrowdStrike Falcon MCP server provides AI assistants with access to CrowdStrike's cybersecurity platform for endpoint protection and threat intelligence. It enables security monitoring, incident response, threat hunting, and vulnerability management workflows.
**Configuration Parameters:**
* **CrowdStrike Falcon Client ID** \* - Configuration value
* **CrowdStrike Falcon Client Secret** \* - Secret access key for authentication
* **Base URL for CrowdStrike API** \* - Service instance URL
**Setup Steps:**
1. Log in to your CrowdStrike account
2. Navigate to Support → API Clients and Keys
3. Generate a new API token or key
4. Copy the token for configuration
5. Ensure your account has appropriate permissions for CrowdStrike API access
***
# Cyera DataPort
Connect AI assistants to Cyera DataPort data via Snowflake.
{% hint style="warning" %}
**Early Access** — Reach out to your Natoma representative for access.
{% endhint %}
**Type:** Community
**Source Type:** Repository
**Description:** Cyera DataPort MCP server provides AI assistants with read-only access to Cyera DataPort data in your Snowflake account. It enables querying data classifications, sensitivity labels, and lineage to support data-governance workflows.
**Configuration Parameters:**
* **Snowflake Account** \* - Snowflake account identifier (e.g. `xy12345.us-east-1`).
* **Snowflake User** \* - Snowflake service user (e.g. `DATAPORT_MCP_USER`).
* **Snowflake RSA Private Key** \* (sensitive) - PEM-encoded private key contents for key-pair auth.
* **Snowflake RSA Key Passphrase** (sensitive) (optional) - Passphrase for the RSA key (optional).
* **Snowflake Role** (optional) - Snowflake role. Default: `DATAPORT_MCP_READONLY`.
* **Snowflake Database** (optional) - Snowflake database. Default: `CYERA_DATAPORT`.
* **Snowflake Warehouse** (optional) - Snowflake warehouse. Default: `WH_LARGE`.
* **Snowflake Schema** (optional) - Snowflake schema. Default: `product`.
* **AWS Access Key ID** \* (sensitive) - AWS access key for the DataPort context S3 bucket.
* **AWS Secret Access Key** \* (sensitive) - AWS secret access key paired with the access key ID.
* **S3 Bucket Name** (optional) - DataPort context bucket. Default: `edp-mcp`.
**Setup Steps:**
1. In Snowflake, create or identify a service user (e.g. `DATAPORT_MCP_USER`) and grant it the `DATAPORT_MCP_READONLY` role (or a custom read-only role over the DataPort schema).
2. Generate an RSA key pair, assign the public key to the user, and have the PEM-encoded private key ready (with passphrase if encrypted).
3. In AWS IAM, create or use a service user with `s3:GetObject` and `s3:ListBucket` on the DataPort context bucket. Generate an Access Key ID and Secret Access Key.
4. When creating the connection in Natoma, enter the Snowflake account/user/key fields and AWS access key fields, then save.
# DailyMed
**Type:** Community
**Source Type:** Repository
**Source:** [GitHub](https://github.com/RowanErasmus/dailymed-mcp-server)
**Description:** DailyMed MCP server provides AI assistants with access to comprehensive drug information from the U.S. National Library of Medicine's DailyMed database. It enables queries for medication details, drug labels, prescribing information, and pharmaceutical data, supporting healthcare and pharmaceutical research workflows.
**Configuration Parameters:**
* No configuration required
**Setup Steps:**
1. No setup required - the server uses the public DailyMed API
2. DailyMed is a free service provided by the U.S. National Library of Medicine
3. No API key or authentication needed
***
# Database Universal
Connect AI assistants to PostgreSQL, MySQL, MariaDB, or Oracle databases.
{% hint style="warning" %}
**Early Access** — Reach out to your Natoma representative for access.
{% endhint %}
**Type:** Community
**Source Type:** Repository
**Description:** Database Universal MCP server provides AI assistants with access to PostgreSQL, MySQL, MariaDB, and Oracle databases. It supports natural-language SQL queries through a single connection string or component fields.
**Configuration Parameters:**
* **Connection String (DSN)** (sensitive) (use this OR the fields below) - Full DSN, e.g. `postgres://user:pass@host:5432/db`. Use either this or the component fields below.
* **Database Type** (optional) - `postgres`, `mysql`, `mariadb`, or `oracle`.
* **Database Host** (optional) - Database hostname.
* **Database Port** (optional) - Database port. Defaults to the standard port for the chosen type.
* **Database User** (optional) - Database username.
* **Database Password** (sensitive) (optional) - Database password.
* **Database Name** (optional) - Database name.
* **Read-only** (optional) - Set to `true` to disable writes (recommended for first-time setup).
**Setup Steps:**
1. Identify the database user that the MCP server will connect as. Read-only access is strongly recommended for initial deployments.
2. Either compose the full DSN or note the host/port/user/password/database fields separately.
3. When creating the connection in Natoma, enter the DSN (or the component fields) and save.
# Databricks
**Type:** Community
**Source Type:** Repository
**Source:** [GitHub](https://github.com/JordiNeil/mcp-databricks-server)
**Description:** Databricks MCP server enables AI assistants to interact with Databricks lakehouse platform for data analytics and machine learning. It provides access to SQL warehouses, data queries, and workspace resources, facilitating intelligent data exploration and analysis workflows within the unified analytics environment.
**Configuration Parameters:**
* **Databricks Instance URL** \* - Databricks workspace instance URL
* **Databricks Token** \* - Authentication token for API access
* **Databricks HTTP Path for API requests** \* - HTTP path for API requests. Default: `/sql/1.0/warehouse/*********`
**Setup Steps:**
1. Log in to your Databricks workspace
2. Navigate to User Settings → Access Tokens
3. Click 'Generate New Token'
4. Set token lifetime and description
5. Copy the generated token immediately (it won't be shown again)
6. Locate your SQL warehouse HTTP path in Workspace → SQL Warehouses → Connection Details
7. Note your Databricks instance URL (e.g., )
***
# Datadog
**Type:** Official
**Source Type:** Remote URL
**Source:** URL varies depending on Datadog cell
**Description:** Integrates with Datadog's monitoring and analytics platform to provide comprehensive observability capabilities across infrastructure, applications, and logs. Enables Claude to query metrics, create and manage dashboards, set up monitors and alerts, analyze APM traces, access log data, and retrieve infrastructure inventory for full-stack monitoring and troubleshooting.
**Configuration Parameters:**
* **Cell** \* - Datadog cell (e.g., "datadoghq.com", "datadoghq.eu", "us3.datadoghq.com", "us5.datadoghq.com")
**Setup Steps:** Not applicable
# Datadog (Community)
**Type:** Community
**Source Type:** Repository
**Source:** [GitHub](https://github.com/winor30/mcp-server-datadog)
**Description:** Datadog (Community) MCP server enables AI assistants to interact with Datadog's monitoring and observability platform. It provides access to metrics, logs, traces, and dashboards for infrastructure monitoring, application performance management, and intelligent incident response.
**Configuration Parameters:**
* **Datadog API key** \* - API key for authentication
* **Datadog Application key** \* - Configuration value
* **Datadog site (e.g. datadoghq.eu)** - Configuration value (optional). Default: `datadoghq.com`
**Setup Steps:**
1. Log in to your Datadog account
2. Navigate to Organization Settings → API Keys
3. Generate a new API token or key
4. Copy the token for configuration
5. Ensure your account has appropriate permissions for Datadog API access
***
# DataForSEO
**Type:** Official
**Source Type:** Repository
**Source:** [GitHub](https://github.com/dataforseo/mcp-server-typescript)
**Description:** DataForSEO MCP server provides AI assistants with access to comprehensive SEO and digital marketing data through DataForSEO's APIs. It enables SERP analysis, keyword research, backlink monitoring, and competitive intelligence gathering for SEO optimization workflows.
**Configuration Parameters:**
* **If set to true, the server will return the full API responses.** - Configuration value (optional)
* **Password for DataForSEO** \* - Password for authentication
* **Username for DataForSEO** \* - Username for authentication
* **Comma-separated list of enabled modules. If empty, all modules are enabled.** - Configuration value (optional)
**Setup Steps:**
1. Log in to your DataForSEO account
2. Navigate to Dashboard → API Credentials
3. Generate a new API token or key
4. Copy the token for configuration
5. Ensure your account has appropriate permissions for DataForSEO API access
***
# Dovetail
**Type:** Official
**Source Type:** Repository
**Source:** [GitHub](https://github.com/dovetail/dovetail-mcp)
**Description:** Dovetail MCP server provides AI assistants with access to Dovetail's user research and insights platform. It enables analysis of user interviews, research synthesis, insight discovery, and collaborative qualitative data analysis for product development teams.
**Configuration Parameters:**
* **Dovetail API Token** \* - Authentication token for API access
**Setup Steps:**
1. Log in to your Dovetail account
2. Navigate to Settings → Integrations → API Tokens
3. Generate a new API token or key
4. Copy the token for configuration
5. Ensure your account has appropriate permissions for Dovetail API access
***
# Draw\.io
Create and edit Draw\.io diagrams from AI assistants.
**Type:** Official
**Source Type:** Remote URL
**Source:**
**Description:** Draw\.io MCP server provides AI assistants with the ability to create and update Draw\.io diagrams via natural language. The server is hosted by Draw\.io.
***
## Setup
No setup required. Click **Authorize** in your Natoma workspace to connect.
# Dropbox
**Type:** Community
**Source Type:** Repository
**Source:** [GitHub](https://github.com/N8Maynard91/dbx-admin-mcp)
**Description:** Dropbox MCP server enables AI assistants to interact with Dropbox's file storage and collaboration platform for administrative operations. It provides capabilities for file management, sharing controls, and team administration within Dropbox Business workspaces.
**Configuration Parameters:**
* **DropboxSPublicWorkspace APIKey** \* - API key for authentication
* **Port** - Configuration value (optional)
**Setup Steps:**
1. Log in to your Dropbox account
2. Navigate to Settings → API Settings → API Keys
3. Generate a new API token or key
4. Copy the token for configuration
5. Ensure your account has appropriate permissions for Dropbox API access
***
# Excalidraw
Create and edit Excalidraw diagrams from AI assistants.
**Type:** Official
**Source Type:** Repository
**Source:** [GitHub](https://github.com/excalidraw/excalidraw-mcp)
**Description:** Excalidraw MCP server provides AI assistants with the ability to create and update Excalidraw diagrams.
***
## Setup
No setup required. Click **Authorize** in your Natoma workspace to connect.
# Fetch
**Type:** Community
**Source Type:** Repository
**Source:** [GitHub](https://github.com/modelcontextprotocol/servers/tree/main/src/fetch)
**Description:** Fetch MCP server provides AI assistants with web content retrieval and processing capabilities. It enables URL fetching, content extraction, and web scraping functionality with configurable security settings for accessing and analyzing web-based information.
**Configuration Parameters:**
* **gpgKey** \* - Configuration value
* **pythonVersion** \* - Configuration value
* **pythonSha256** \* - Configuration value
**Setup Steps:**
1. Log in to your Fetch account
2. Navigate to Settings → API Settings → API Keys
3. Generate a new API token or key
4. Copy the token for configuration
5. Ensure your account has appropriate permissions for Fetch API access
***
# Figma Desktop
Connect AI assistants to the Figma Desktop app via its local Dev Mode MCP server.
**Type:** Official
**Source Type:** Local Package
**Source:** Figma Dev Mode
**Description:** Figma Desktop MCP server connects AI assistants to your local Figma Desktop application via Figma's built-in MCP endpoint. It enables reading the currently selected frame, components, and design tokens — useful for design-to-code workflows.
***
## Setup
### Prerequisites
Figma Desktop must be running with **Preferences → Enable local MCP Server** turned on. The server listens on `http://127.0.0.1:3845/mcp`. No credentials are required because the connection is local-only.
# Filesystem
Give AI assistants sandboxed read/write access to local directories.
**Type:** Official
**Source Type:** Local Package
**Description:** Filesystem MCP server provides AI assistants with read/write access to local directories on the host where the MCP client runs. It is intended for desktop/local use and is sandboxed to the directories you allow.
**Configuration Parameters:**
* **Allowed Directories** \* - Comma-separated full paths to expose to the assistant (e.g. `/Users//Documents,/Users//work`). Avoid system roots.
**Setup Steps:**
1. List the **full absolute paths** of directories you want the assistant to access. Avoid system roots like `/` or `C:\`.
2. When creating the connection in Natoma, enter the comma-separated list and save.
# Firecrawl
**Type:** Official
**Source Type:** Repository
**Source:** [GitHub](https://github.com/firecrawl/firecrawl-mcp-server)
**Description:** Firecrawl MCP server enables AI assistants to perform advanced web scraping and crawling operations through Firecrawl's API. It provides capabilities for structured data extraction, website monitoring, and automated content collection with support for dynamic JavaScript-rendered pages.
**Configuration Parameters:**
* **Firecrawl API Key** \* - API key for authentication
* **Custom Firecrawl API URL for self-hosted instances** - Service instance URL (optional)
**Setup Steps:**
1. Log in to your Firecrawl account
2. Navigate to Dashboard → API Keys
3. Generate a new API token or key
4. Copy the token for configuration
5. Ensure your account has appropriate permissions for Firecrawl API access
***
# Fireflies.ai
**Type:** Official
**Source Type:** Remote URL
**Source:**
**Description:** Fireflies.ai MCP server provides access to meeting recordings, transcripts, and AI-generated notes. It enables AI assistants to search, analyze, and extract insights from your meeting data, supporting productivity and knowledge management workflows.
**Configuration Parameters:**
* No additional configuration required (OAuth handled automatically)
## **Setup Steps:** Not applicable
# Freshservice
**Type:** Community
**Source Type:** Repository
**Source:** [GitHub](https://github.com/effytech/freshservice_mcp)
**Description:** Freshservice MCP server provides AI assistants with access to Freshservice's IT service management platform. It enables ticket management, asset tracking, change management, and ITIL-compliant workflows, allowing for intelligent automation of IT service delivery and support operations.
**Configuration Parameters:**
* **Freshservice APIkey** \* - API key for authentication
* **FreshserviceDomain** \* - Configuration value
**Setup Steps:**
1. Log in to your Freshservice account
2. Navigate to Profile Settings → API Key
3. Generate or copy your existing API key
4. Note your Freshservice domain (e.g., your-company.freshservice.com)
5. Ensure your account has appropriate permissions for API access
***
# FullStory Lexicon
Connect AI assistants to FullStory analytics with an API key.
{% hint style="warning" %}
**Early Access** — Reach out to your Natoma representative for access.
{% endhint %}
**Type:** Official
**Source Type:** Repository
**Source:** [GitHub](https://github.com/fullstorydev/fs-lexicon)
**Description:** FullStory Lexicon MCP server provides AI assistants with access to your FullStory analytics data. It enables querying sessions, events, and user properties to support digital-experience analytics workflows.
**Configuration Parameters:**
* **FullStory Production API Key** \* (sensitive) - API key generated in FullStory under **Settings → Integrations & APIs → API Keys**.
* **FullStory Org ID** \* - Org ID found in **Settings → Org Settings → Org Information**.
* **FullStory Datacenter** (optional) - `NA1` (default), `EU1`, etc.
* **Safe Mode** (optional) - Set to `true` to restrict to read-only tools.
**Setup Steps:**
1. Log in to FullStory.
2. Navigate to **Settings → Integrations & APIs → API Keys** and create an API key with the scopes you need.
3. Note your **Org ID** and **Datacenter** (visible in Settings).
4. When creating the connection in Natoma, paste the API key, Org ID, and datacenter, and save.
# GenAI Toolbox
Connect AI assistants to common databases with Google's GenAI Toolbox.
{% hint style="warning" %}
**Early Access** — Reach out to your Natoma representative for access.
{% endhint %}
**Type:** Official
**Source Type:** Local Package
**Source:** [GitHub](https://github.com/googleapis/genai-toolbox)
**Description:** GenAI Toolbox for Databases is Google's open-source MCP server for connecting AI assistants to common databases. It provides a unified interface across BigQuery, PostgreSQL, MySQL, Spanner, Snowflake, Neo4j, and others — see the project's documentation for the full list.
***
## Setup
**Configuration Parameters:**
* **Prebuilt** \* - Prebuilt data source to connect to (e.g. `bigquery`, `postgres`, `mysql`, `spanner`, `snowflake`, `neo4j`).
When creating the connection in Natoma, enter the values above.
For most data sources you'll want one of the dedicated GenAI Toolbox servers — **BigQuery (Toolbox)**, **Looker (Toolbox)**, **Oracle DB (Toolbox)**, **PostgreSQL (Toolbox)** — which include the credential fields specific to that data source.
# GitHub
**Type:** Official
**Source Type:** Remote URL
**Source:**
**Description:** GitHub MCP server provides AI assistants with comprehensive access to GitHub's platform for repository management, code review, and collaboration. It enables operations on repositories, issues, pull requests, and other GitHub resources through a remote API endpoint with static credential authentication.
**Configuration Parameters:**
* **The personal access token for accessing the GitHub API.** \* - Personal access token for authentication
**Setup Steps:**
1. Log in to your GitHub account
2. Navigate to Settings → Developer settings → Personal access tokens
3. Generate a new API token or key
4. Copy the token for configuration
5. Ensure your account has appropriate permissions for GitHub API access
***
# GitHub (Local)
Run a local GitHub MCP server that inherits gh CLI authentication.
{% hint style="warning" %}
**Early Access** — Reach out to your Natoma representative for access.
{% endhint %}
**Type:** Community
**Source Type:** Local Package
**Source:** [npm](https://www.npmjs.com/package/github-local-mcp)
**Description:** GitHub (Local) MCP server is a stdio-based GitHub MCP server that runs locally. It uses your existing `gh` CLI authentication, so no token configuration is required in Natoma.
***
## Setup
### Prerequisites
The host running the MCP server must have the [GitHub CLI](https://cli.github.com/) installed and authenticated (`gh auth login`). The server inherits whichever account is currently logged in.
For a hosted GitHub MCP server with explicit credentials, use **GitHub** (PAT) or **GitHub (OAuth)**.
# GitHub (OAuth)
Connect AI assistants to GitHub using OAuth authentication via a GitHub App.
**Type:** Official
**Source Type:** Remote URL
**Description:** GitHub MCP server provides AI assistants with comprehensive access to GitHub's platform for repository management, code review, and collaboration. It enables operations on repositories, issues, pull requests, and other GitHub resources through a remote API endpoint with OAuth authentication.
**Prerequisites:**
* Admin access to GitHub
* Admin access to your Natoma org
***
## Setup
### Step 1: Configure a GitHub App in GitHub
1. In GitHub, navigate to **Settings > Developer Settings > GitHub Apps**.
2. Click **New GitHub App** in the top right corner.
3. Fill in the following:
* **App name:** Natoma OAuth (or any descriptive label)
* **Homepage URL:** `https://natoma.ai`
* **Authorization Callback URL:**
{% hint style="warning" %}
Use exactly this callback URL — the OAuth flow will fail if it doesn't match.
{% endhint %}
```
https://api.natoma.app/mcp/server/callback
```
4. Click **Register Application**.
5. Copy the **Client ID** and generate a **Client Secret** — you'll need both in the next step.
### Step 2: Configure the OAuth Client in Natoma
1. In the Natoma portal, navigate to **Apps** and find **GitHub (OAuth)**.
2. Click **+** > **Enable Personal Connections**.
3. Enter the **Client ID** and **Client Secret** from Step 1.
4. Click **Save**.
### Step 3: Connect Your GitHub Account
1. In Natoma, navigate to **My Connections**.
2. Select **GitHub (OAuth)** > **Add Personal Connection**.
3. Click **Authorize Connection**.
4. Accept the OAuth consent flow in GitHub.
5. You will be redirected back to Natoma upon successful authorization.
6. Click **Test Connection** to verify everything is working.
# GitLab
**Type:** Official
**Source Type:** Repository
**Source:** [GitHub](https://github.com/modelcontextprotocol/servers/tree/main/src/gitlab)
**Description:** GitLab MCP server enables AI assistants to interact with GitLab's DevOps platform for source control, CI/CD, and project management. It provides access to repositories, merge requests, pipelines, and issue tracking for comprehensive development workflow automation.
**Configuration Parameters:**
* **Your GitLab personal access token.** \* - Personal access token for authentication
* **Base URL for GitLab API, optional for self-hosted instances.** - Service instance URL (optional). Default: `https://gitlab.com/api/v4`
**Setup Steps:**
1. Log in to your GitLab account
2. Navigate to User Settings → Access Tokens
3. Generate a new API token or key
4. Copy the token for configuration
5. Ensure your account has appropriate permissions for GitLab API access
***
# GitLab (Legacy)
Connect AI assistants to GitLab using a personal access token. Use the GitLab (OAuth) variant for new connections.
**Type:** Official
**Source Type:** Repository
**Source:** [GitHub](https://github.com/modelcontextprotocol/servers/tree/main/src/gitlab)
**Description:** GitLab (Legacy) MCP server enables AI assistants to interact with GitLab repositories using a personal access token. This is the original GitLab MCP server — for new connections, prefer **GitLab** which uses OAuth.
**Configuration Parameters:**
* **GitLab Personal Access Token** \* (sensitive) - Generated in GitLab under **User Settings → Access Tokens**.
* **GitLab API URL** (optional) - Base URL for self-hosted instances. Default: `https://gitlab.com/api/v4`.
**Setup Steps:**
1. Log in to GitLab and navigate to **User Settings → Access Tokens**.
2. Click **Add new token**, name it, and select scopes — typically `api`, `read_repository`, and (if needed) `write_repository`.
3. Click **Create personal access token** and copy the value — GitLab will not show it again.
4. When creating the connection in Natoma, paste the token (and the API URL if self-hosted) and save.
# Glean
Connect AI assistants to your Glean instance with OAuth.
{% hint style="warning" %}
**Early Access** — Reach out to your Natoma representative for access.
{% endhint %}
**Type:** Official
**Source Type:** Remote URL
**Source:** `https://{your-company-be.glean.com}/mcp/default`
**Description:** Glean MCP server provides AI assistants with access to Glean's enterprise search and knowledge platform. It enables natural-language search across all of your connected SaaS tools, document retrieval, and answers from your org's collective knowledge.
***
## Setup
### Admin Setup
In Natoma, an admin adds **Glean** under **Apps** and enters:
| Field | Value |
| ----------------------- | ------------------------- |
| Glean Instance Hostname | your-company-be.glean.com |
### Authorize Your Connection
When prompted while creating the connection in Natoma, click **Authorize** to complete OAuth.
# Gmail (Natoma)
Connect AI assistants to Gmail to read, search, draft, send, and organize emails through Natoma.
{% hint style="warning" %}
**Early Access** — This server is currently in early access. Features and configuration may change.
{% endhint %}
**Type:** Natoma Hosted
**Source Type:** Remote URL
**Description:** This connection enables you to connect AI to your Gmail to read, search, draft, send, and organize emails. Available tools are a subset of the Google Workspace Server.
***
## Setup
### Step 1: Enable the Gmail API
1. Go to the [Google Cloud Console](https://console.cloud.google.com/).
2. Make sure your target project is selected in the top project dropdown.
3. In the left sidebar, navigate to **APIs & Services > Library**.
4. Search for **Gmail API** and click on it.
5. Click **Enable**.
### Step 2: Configure the OAuth Consent Screen
1. In the Google Cloud Console, go to **Google Auth Platform > Branding** (or search "OAuth consent screen" in the top search bar).
2. If the Auth Platform isn't set up yet, click **Get Started** and fill in the following:
* **App name:** Gmail MCP Server
* **User support email:** your email address — click **Next**
* **Audience:** Select **Internal** if your account is part of a Google Workspace organization — click **Next**
* **Contact email:** your email address — click **Next**
3. Agree to the Google API Services User Data Policy, then click **Continue > Create**.
4. Click **Data Access** in the left menu, then click **Add or Remove Scopes**.
5. In the panel that appears, scroll down to **Manually add scopes** and paste in both scopes (one per line):
```
https://www.googleapis.com/auth/gmail.readonly
https://www.googleapis.com/auth/gmail.compose
```
6. Click **Add to Table**, then **Update**, then **Save**.
### Step 3: Create an OAuth 2.0 Client ID
1. Go to **Google Auth Platform > Clients > Create Client** and select **Web application** as the application type.
2. Name the application.
3. In the **Authorized redirect URIs** section, click **+ Add URI** and enter:
{% hint style="warning" %}
Use exactly this redirect URI — Natoma will not complete the OAuth flow if it doesn't match.
{% endhint %}
```
https://api.natoma.app/mcp/server/callback
```
4. Click **Create** and copy the **Client ID** and **Client Secret**.
### Step 4: Configure the Connector in Natoma
1. Log in to your Natoma workspace as an Admin and navigate to **Apps**, then search for **Gmail (Natoma)**.
2. Click **+** > **Allow Personal Connections**.
3. In the connector configuration dialog, enter the following:
| Field | Value |
| ------------------- | ------------------------------------ |
| Server name | Gmail MCP (or any descriptive label) |
| OAuth Client ID | The Client ID from Step 3 |
| OAuth Client Secret | The Client Secret from Step 3 |
4. Save the connector. Natoma will initiate an OAuth consent flow.
5. Click **Test Connection** to reveal all available tools.
# Gong
**Type:** Community
**Source Type:** Repository
**Source:** [GitHub](https://github.com/kenazk/gong-mcp)
**Description:** Gong MCP server provides AI assistants with access to Gong's revenue intelligence platform for analyzing sales conversations and customer interactions. It enables insights extraction, deal intelligence, and conversation analytics for sales performance optimization.
**Configuration Parameters:**
* **Gong Access Key** \* - Access key ID for authentication
* **Gong Access Secret** \* - Secret access key for authentication
**Setup Steps:**
1. Log in to your Gong account
2. Navigate to Settings → API Settings → API Keys
3. Generate a new API token or key
4. Copy the token for configuration
5. Ensure your account has appropriate permissions for Gong API access
***
# Gong (Community)
Connect AI assistants to Gong using API key/secret authentication.
{% hint style="warning" %}
**Early Access** — Reach out to your Natoma representative for access.
{% endhint %}
**Type:** Community
**Source Type:** Repository
**Description:** Gong (Community) MCP server provides AI assistants with access to Gong's revenue intelligence platform using API key/secret authentication. It enables querying calls, transcripts, deals, and stats.
**Configuration Parameters:**
* **Gong Access Key** \* (sensitive) - Generated in Gong under **Company Settings → API → API Keys**.
* **Gong Access Secret** \* (sensitive) - Paired with the Access Key. Gong only shows the secret once.
**Setup Steps:**
1. Log in to Gong as an admin.
2. Navigate to **Company Settings → API → API Keys** and click **Create**.
3. Copy the **Access Key** and **Access Secret**.
4. When creating the connection in Natoma, paste both values and save.
# Google Calendar (Natoma)
Connect AI assistants to Google Calendar for event management and scheduling through Natoma.
{% hint style="warning" %}
**Early Access** — This server is currently in early access. Features and configuration may change.
{% endhint %}
**Type:** Natoma Hosted
**Source Type:** Remote URL
**Description:** This connection enables AI-powered calendar management, event creation, and scheduling through Natoma. Available tools are a subset of the Google Workspace Server.
***
## Setup
### Step 1: Enable the Google Calendar API
1. Go to the [Google Cloud Console](https://console.cloud.google.com/).
2. Make sure your target project is selected in the top project dropdown.
3. In the left sidebar, navigate to **APIs & Services > Library**.
4. Search for **Google Calendar API** and click on it.
5. Click **Enable**.
You can also enable both APIs directly:
* [Google Calendar API](https://console.cloud.google.com/flows/enableapi?apiid=calendar.googleapis.com)
* [Google Calendar MCP API](https://console.cloud.google.com/flows/enableapi?apiid=calendarmcp.googleapis.com)
### Step 2: Configure the OAuth Consent Screen
1. In the Google Cloud Console, go to **Google Auth Platform > Branding** (or search "OAuth consent screen" in the top search bar).
2. If the Auth Platform isn't set up yet, click **Get Started** and fill in the following:
* **App name:** Google Calendar MCP Server
* **User support email:** your email address — click **Next**
* **Audience:** Select **Internal** — click **Next**
* **Contact email:** your email address
3. Agree to the Google API Services User Data Policy, then click **Continue > Create**.
4. Click **Data Access** in the left menu, then click **Add or Remove Scopes**.
5. In the panel that appears, scroll down to **Manually add scopes** and paste in both scopes (one per line):
```
https://www.googleapis.com/auth/calendar.readonly
https://www.googleapis.com/auth/calendar.events
```
6. Click **Add to Table**, then **Update**, then **Save**.
### Step 3: Create an OAuth 2.0 Client ID
1. Go to **Google Auth Platform > Clients > Create Client** and select **Web application** as the application type.
2. Name the application.
3. In the **Authorized redirect URIs** section, click **+ Add URL** and enter:
{% hint style="warning" %}
Use exactly this redirect URI — Natoma will not complete the OAuth flow if it doesn't match.
{% endhint %}
```
https://api.natoma.app/mcp/server/callback
```
4. Click **Create** and copy the **Client ID** and **Client Secret**.
### Step 4: Configure the Connector in Natoma
1. Log in to your Natoma workspace as an Admin and navigate to **Apps**, then search for **Google Calendar (Natoma)**.
2. Click **+** > **Allow Personal Connections**.
3. In the connector configuration dialog, enter the following:
| Field | Value |
| ------------------- | ---------------------------------------------- |
| Server name | Google Calendar MCP (or any descriptive label) |
| OAuth Client ID | The Client ID from Step 3 |
| OAuth Client Secret | The Client Secret from Step 3 |
4. Save the connector. Natoma will initiate an OAuth consent flow to authorize access to your Google Calendar.
# Google Calendar (Official)
Connect AI assistants to Google Calendar using Google's official remote MCP server with an admin-supplied OAuth client.
{% hint style="warning" %}
**Early Access** — Reach out to your Natoma representative for access.
{% endhint %}
**Type:** Official
**Source Type:** Remote URL
**Source:**
**Description:** Google Calendar MCP server is Google's official remote MCP integration for Calendar. It enables creating, listing, updating, and deleting events, managing calendars, and looking up free/busy information through OAuth.
***
## Setup
### Admin Setup (one-time)
1. In the [Google Cloud Console](https://console.cloud.google.com/), select the project that should own the OAuth client.
2. Navigate to **APIs & Services > Library**, search for **Google Calendar API**, and click **Enable**.
3. Navigate to **Google Auth Platform > Branding** and configure the OAuth Consent Screen (App name, support email, audience, contact email).
4. Under **Data Access > Add or Remove Scopes**, add (one per line):
```
calendar.calendarlist.readonly
calendar.events.readonly
calendar.events.freebusy
```
5. Navigate to **Google Auth Platform > Clients > Create Client** and select **Web application**.
6. Under **Authorized redirect URIs**, click **+ Add URI** and enter:
{% hint style="warning" %}
Use exactly this redirect URI — Google will reject the OAuth flow if it doesn't match.
{% endhint %}
```
https://api.natoma.app/mcp/server/callback
```
7. Click **Create** and copy the **Client ID** and **Client Secret**.
In Natoma, an admin adds **Google Calendar** under **Apps** and enters the **Client ID** and **Client Secret**.
### Authorize Your Connection
When prompted while creating the connection in Natoma, click **Authorize**.
# Google Chat
Connect AI assistants to Google Chat using Google's official remote MCP server with an admin-supplied OAuth client.
{% hint style="warning" %}
**Early Access** — Reach out to your Natoma representative for access.
{% endhint %}
**Type:** Official
**Source Type:** Remote URL
**Source:**
**Description:** Google Chat MCP server is Google's official remote MCP integration for Chat. It enables sending and reading messages, managing spaces, and interacting with members and threads through OAuth.
***
## Setup
### Admin Setup (one-time)
1. In the [Google Cloud Console](https://console.cloud.google.com/), select the project that should own the OAuth client.
2. Navigate to **APIs & Services > Library**, search for **Google Chat API**, and click **Enable**.
3. Navigate to **Google Auth Platform > Branding** and configure the OAuth Consent Screen (App name, support email, audience, contact email).
4. Under **Data Access > Add or Remove Scopes**, add (one per line):
```
chat.spaces.readonly
chat.memberships.readonly
chat.messages.readonly
chat.users.readstate.readonly
```
5. Navigate to **Google Auth Platform > Clients > Create Client** and select **Web application**.
6. Under **Authorized redirect URIs**, click **+ Add URI** and enter:
{% hint style="warning" %}
Use exactly this redirect URI — Google will reject the OAuth flow if it doesn't match.
{% endhint %}
```
https://api.natoma.app/mcp/server/callback
```
7. Click **Create** and copy the **Client ID** and **Client Secret**.
In Natoma, an admin adds **Google Chat** under **Apps** and enters the **Client ID** and **Client Secret**.
### Authorize Your Connection
When prompted while creating the connection in Natoma, click **Authorize**.
# Google Docs (Natoma)
Connect AI assistants to Google Docs for document creation, editing, and management through Natoma.
{% hint style="warning" %}
**Early Access** — This server is currently in early access. Features and configuration may change.
{% endhint %}
**Type:** Natoma Hosted
**Source Type:** Remote URL
**Description:** This connection enables AI-powered document creation, editing, and management directly through Natoma. Available tools are a subset of the Google Workspace Server.
***
## Setup
### Step 1: Enable the Google Docs API
1. Go to the [Google Cloud Console](https://console.cloud.google.com/).
2. Make sure your target project is selected in the top project dropdown.
3. In the left sidebar, navigate to **APIs & Services > Library**.
4. Search for **Google Docs API** and click on it.
5. Click **Enable**.
### Step 2: Configure the OAuth Consent Screen
1. In the Google Cloud Console, go to **Google Auth Platform > Branding** (or search "OAuth consent screen" in the top search bar).
2. If the Auth Platform isn't set up yet, click **Get Started** and fill in the following:
* **App name:** Google Docs MCP Server
* **User support email:** your email address — click **Next**
* **Audience:** Select **Internal** — click **Next**
* **Contact email:** your email address
3. Agree to the Google API Services User Data Policy, then click **Continue > Create**.
4. Click **Data Access** in the left menu, then click **Add or Remove Scopes**.
5. In the panel that appears, scroll down to **Manually add scopes** and paste in both scopes (one per line):
```
https://www.googleapis.com/auth/documents
https://www.googleapis.com/auth/drive.file
```
6. Click **Add to Table**, then **Update**, then **Save**.
### Step 3: Create an OAuth 2.0 Client ID
1. Go to **Google Auth Platform > Clients > Create Client** and select **Web application** as the application type.
2. Name the application.
3. In the **Authorized redirect URIs** section, click **+ Add URI** and enter:
{% hint style="warning" %}
Use exactly this redirect URI — Natoma will not complete the OAuth flow if it doesn't match.
{% endhint %}
```
https://api.natoma.app/mcp/server/callback
```
4. Click **Create** and copy the **Client ID** and **Client Secret**.
### Step 4: Configure the Connector in Natoma
1. Log in to your Natoma workspace as an Admin and navigate to **Apps**, then search for **Google Docs (Natoma)**.
2. Click **+** > **Allow Personal Connections**.
3. In the connector configuration dialog, enter the following:
| Field | Value |
| ------------------- | ------------------------------------------ |
| Server name | Google Docs MCP (or any descriptive label) |
| OAuth Client ID | The Client ID from Step 3 |
| OAuth Client Secret | The Client Secret from Step 3 |
4. Save the connector. Natoma will initiate an OAuth consent flow to authorize access to your Google Docs.
# Google Drive (Natoma)
Connect AI assistants to Google Drive using Natoma's hosted OAuth MCP server.
{% hint style="warning" %}
**Early Access** — This server is currently in early access. Features and configuration may change.
{% endhint %}
**Type:** Natoma Hosted
**Source Type:** Remote URL
**Description:** Google Drive MCP server provides AI assistants with access to Google Drive. This is a subset of the available tools in the Google Workspace MCP Server, created by Natoma.
***
## Setup
### Step 1: Enable the Google Drive API
1. Go to the [Google Cloud Console](https://console.cloud.google.com/).
2. Make sure your target project is selected in the top project dropdown.
3. In the left sidebar, navigate to **APIs & Services > Library**.
4. Search for **Google Drive API** and click on it.
5. Click **Enable**.
You can also enable it directly: [Google Drive API](https://console.cloud.google.com/flows/enableapi?apiid=drive.googleapis.com)
### Step 2: Configure the OAuth Consent Screen
1. In the Google Cloud Console, go to **Google Auth Platform > Branding** (or search "OAuth consent screen" in the top search bar).
2. If the Auth Platform isn't set up yet, click **Get Started** and fill in the following:
* **App name:** Drive MCP Server
* **User support email:** your email address — click **Next**
* **Audience:** Select **Internal** — click **Next**
* **Contact email:** your email address
3. Agree to the Google API Services User Data Policy, then click **Continue > Create**.
4. Click **Data Access** in the left menu, then click **Add or Remove Scopes**.
5. In the panel that appears, scroll down to **Manually add scopes** and paste in both scopes (one per line):
```
https://www.googleapis.com/auth/drive.readonly
https://www.googleapis.com/auth/drive.file
```
6. Click **Add to Table**, then **Update**, then **Save**.
### Step 3: Create an OAuth 2.0 Client ID
1. Go to **Google Auth Platform > Clients > Create Client**.
2. Select **Web application** as the application type.
3. Name the application.
4. In the **Authorized redirect URIs** section, click **+ Add URL** and enter:
{% hint style="warning" %}
Use exactly this redirect URI — Natoma will not complete the OAuth flow if it doesn't match.
{% endhint %}
```
https://api.natoma.app/mcp/server/callback
```
5. Click **Create** and copy the **Client ID** and **Client Secret**.
### Step 4: Configure the Connector in Natoma
1. Log in to your Natoma workspace as an Admin and navigate to **Apps**, then search for **Google Drive (Natoma)**.
2. Click **+** > **Allow Personal Connections**.
3. In the connector configuration dialog, enter the following:
| Field | Value |
| ------------------- | ------------------------------------------- |
| Server name | Google Drive MCP (or any descriptive label) |
| OAuth Client ID | The Client ID from Step 3 |
| OAuth Client Secret | The Client Secret from Step 3 |
4. Save the connector. Natoma will initiate an OAuth consent flow to authorize access to your Google Drive.
5. Click **Test Connections** to see the available tools that are connected to Natoma.
{% hint style="info" %}
`drive.readonly` grants read access to all files the user can see. `drive.file` is more restrictive — it limits access to files created or explicitly opened by the app. For most Natoma workflows, both scopes are recommended: `drive.readonly` enables broad search and read operations, while `drive.file` enables file creation. The broader `drive` scope (full access) satisfies all requirements but is not recommended under least-privilege best practices.
{% endhint %}
# Google Drive (Official)
Connect AI assistants to Google Drive using Google's official remote MCP server with an admin-supplied OAuth client.
{% hint style="warning" %}
**Early Access** — Reach out to your Natoma representative for access.
{% endhint %}
**Type:** Official
**Source Type:** Remote URL
**Source:**
**Description:** Google Drive MCP server is Google's official remote MCP integration for Drive. It enables searching, reading, creating, and managing files and permissions through OAuth.
***
## Setup
### Admin Setup (one-time)
1. In the [Google Cloud Console](https://console.cloud.google.com/), select the project that should own the OAuth client.
2. Navigate to **APIs & Services > Library**, search for **Google Drive API**, and click **Enable**.
3. Navigate to **Google Auth Platform > Branding** and configure the OAuth Consent Screen (App name, support email, audience, contact email).
4. Under **Data Access > Add or Remove Scopes**, add (one per line):
```
drive.readonly
drive.file
```
5. Navigate to **Google Auth Platform > Clients > Create Client** and select **Web application**.
6. Under **Authorized redirect URIs**, click **+ Add URI** and enter:
{% hint style="warning" %}
Use exactly this redirect URI — Google will reject the OAuth flow if it doesn't match.
{% endhint %}
```
https://api.natoma.app/mcp/server/callback
```
7. Click **Create** and copy the **Client ID** and **Client Secret**.
In Natoma, an admin adds **Google Drive** under **Apps** and enters the **Client ID** and **Client Secret**.
### Authorize Your Connection
When prompted while creating the connection in Natoma, click **Authorize**.
# Google Forms (Natoma)
Connect AI assistants to Google Forms for form creation, question management, and response retrieval through Natoma.
{% hint style="warning" %}
**Early Access** — This server is currently in early access. Features and configuration may change.
{% endhint %}
**Type:** Natoma Hosted
**Source Type:** Remote URL
**Description:** This connection enables AI-powered form creation, question management, and response retrieval through Natoma. Available tools are a subset of the Google Workspace Server.
***
## Setup
### Step 1: Enable the Google Forms API
1. Go to the [Google Cloud Console](https://console.cloud.google.com/).
2. Make sure your target project is selected in the top project dropdown.
3. In the left sidebar, navigate to **APIs & Services > Library**.
4. Search for **Google Forms API** and click on it.
5. Click **Enable**.
You can also enable it directly: [Google Forms API](https://console.cloud.google.com/flows/enableapi?apiid=forms.googleapis.com)
{% hint style="info" %}
Some Forms operations — such as listing forms stored in Drive — also require the Google Drive API. You may enable it alongside Forms: [Google Drive API](https://console.cloud.google.com/flows/enableapi?apiid=drive.googleapis.com)
{% endhint %}
### Step 2: Configure the OAuth Consent Screen
1. In the Google Cloud Console, go to **Google Auth Platform > Branding** (or search "OAuth consent screen" in the top search bar).
2. If the Auth Platform isn't set up yet, click **Get Started** and fill in the following:
* **App name:** Google Forms MCP Server
* **User support email:** your email address — click **Next**
* **Audience:** Select **Internal** — click **Next**
* **Contact email:** your email address
3. Agree to the Google API Services User Data Policy, then click **Continue > Create**.
4. Click **Data Access** in the left menu, then click **Add or Remove Scopes**.
5. In the panel that appears, scroll down to **Manually add scopes** and paste in all three scopes (one per line):
```
https://www.googleapis.com/auth/forms.body.readonly
https://www.googleapis.com/auth/forms.body
https://www.googleapis.com/auth/forms.responses.readonly
```
6. Click **Add to Table**, then **Update**, then **Save**.
{% hint style="info" %}
If your use case requires listing forms from Drive, also add `https://www.googleapis.com/auth/drive.readonly`.
{% endhint %}
### Step 3: Create an OAuth 2.0 Client ID
1. Go to **Google Auth Platform > Clients > Create Client** and select **Web application** as the application type.
2. Name the application.
3. In the **Authorized redirect URIs** section, click **+ Add URL** and enter:
{% hint style="warning" %}
Use exactly this redirect URI — Natoma will not complete the OAuth flow if it doesn't match.
{% endhint %}
```
https://api.natoma.app/mcp/server/callback
```
4. Click **Create** and copy the **Client ID** and **Client Secret**.
### Step 4: Configure the Connector in Natoma
1. Log in to your Natoma workspace as an Admin and navigate to **Apps**, then search for **Google Forms (Natoma)**.
2. Click **+** > **Allow Personal Connections**.
3. In the connector configuration dialog, enter the following:
| Field | Value |
| ------------------- | ------------------------------------------- |
| Server name | Google Forms MCP (or any descriptive label) |
| OAuth Client ID | The Client ID from Step 3 |
| OAuth Client Secret | The Client Secret from Step 3 |
4. Save the connector. Natoma will initiate an OAuth consent flow to authorize access to your Google Forms.
# Google People
Connect AI assistants to Google People using Google's official remote MCP server with an admin-supplied OAuth client.
{% hint style="warning" %}
**Early Access** — Reach out to your Natoma representative for access.
{% endhint %}
**Type:** Official
**Source Type:** Remote URL
**Source:**
**Description:** Google People MCP server provides AI assistants with access to Google Contacts and the People API. It enables searching, reading, creating, and updating contacts and contact groups through OAuth.
***
## Setup
### Admin Setup (one-time)
1. In the [Google Cloud Console](https://console.cloud.google.com/), select the project that should own the OAuth client.
2. Navigate to **APIs & Services > Library**, search for **People API**, and click **Enable**.
3. Navigate to **Google Auth Platform > Branding** and configure the OAuth Consent Screen (App name, support email, audience, contact email).
4. Under **Data Access > Add or Remove Scopes**, add (one per line):
```
directory.readonly
userinfo.profile
contacts.readonly
```
5. Navigate to **Google Auth Platform > Clients > Create Client** and select **Web application**.
6. Under **Authorized redirect URIs**, click **+ Add URI** and enter:
{% hint style="warning" %}
Use exactly this redirect URI — Google will reject the OAuth flow if it doesn't match.
{% endhint %}
```
https://api.natoma.app/mcp/server/callback
```
7. Click **Create** and copy the **Client ID** and **Client Secret**.
In Natoma, an admin adds **Google People** under **Apps** and enters the **Client ID** and **Client Secret**.
### Authorize Your Connection
When prompted while creating the connection in Natoma, click **Authorize**.
# Google Sheets (Natoma)
Connect AI assistants to Google Sheets for spreadsheet management, data reading and writing through Natoma.
{% hint style="warning" %}
**Early Access** — This server is currently in early access. Features and configuration may change.
{% endhint %}
**Type:** Natoma Hosted
**Source Type:** Remote URL
**Description:** This connection enables AI-powered spreadsheet management, data reading and writing, and sheet automation through Natoma. Available tools are a subset of the Google Workspace Server.
***
## Setup
### Step 1: Enable the Google Sheets API
1. Go to the [Google Cloud Console](https://console.cloud.google.com/).
2. Make sure your target project is selected in the top project dropdown.
3. In the left sidebar, navigate to **APIs & Services > Library**.
4. Search for **Google Sheets API** and click on it.
5. Click **Enable**.
You can also enable it directly: [Google Sheets API](https://console.cloud.google.com/flows/enableapi?apiid=sheets.googleapis.com)
{% hint style="info" %}
Some Sheets operations (such as listing and creating files) also require the Google Drive API. You may enable it alongside Sheets: [Google Drive API](https://console.cloud.google.com/flows/enableapi?apiid=drive.googleapis.com)
{% endhint %}
### Step 2: Configure the OAuth Consent Screen
1. In the Google Cloud Console, go to **Google Auth Platform > Branding** (or search "OAuth consent screen" in the top search bar).
2. If the Auth Platform isn't set up yet, click **Get Started** and fill in the following:
* **App name:** Google Sheets MCP Server
* **User support email:** your email address — click **Next**
* **Audience:** Select **Internal** — click **Next**
* **Contact email:** your email address
3. Agree to the Google API Services User Data Policy, then click **Continue > Create**.
4. Click **Data Access** in the left menu, then click **Add or Remove Scopes**.
5. In the panel that appears, scroll down to **Manually add scopes** and paste in both scopes (one per line):
```
https://www.googleapis.com/auth/spreadsheets.readonly
https://www.googleapis.com/auth/spreadsheets
```
6. Click **Add to Table**, then **Update**, then **Save**.
{% hint style="info" %}
If your use case requires creating or copying spreadsheet files in Drive, also add the Drive scopes listed in the tools table below.
{% endhint %}
### Step 3: Create an OAuth 2.0 Client ID
1. Go to **Google Auth Platform > Clients > Create Client** and select **Web application** as the application type.
2. Name the application.
3. In the **Authorized redirect URIs** section, click **+ Add URL** and enter:
{% hint style="warning" %}
Use exactly this redirect URI — Natoma will not complete the OAuth flow if it doesn't match.
{% endhint %}
```
https://api.natoma.app/mcp/server/callback
```
4. Click **Create** and copy the **Client ID** and **Client Secret**.
### Step 4: Configure the Connector in Natoma
1. Log in to your Natoma workspace as an Admin and navigate to **Apps**, then search for **Google Sheets (Natoma)**.
2. Click **+** > **Allow Personal Connections**.
3. In the connector configuration dialog, enter the following:
| Field | Value |
| ------------------- | -------------------------------------------- |
| Server name | Google Sheets MCP (or any descriptive label) |
| OAuth Client ID | The Client ID from Step 3 |
| OAuth Client Secret | The Client Secret from Step 3 |
4. Save the connector. Natoma will initiate an OAuth consent flow to authorize access to your Google Sheets.
# Google Slides (Natoma)
Connect AI assistants to Google Slides for presentation management, slide reading, and content editing through Natoma.
{% hint style="warning" %}
**Early Access** — This server is currently in early access. Features and configuration may change.
{% endhint %}
**Type:** Natoma Hosted
**Source Type:** Remote URL
**Description:** This connection enables AI-powered presentation management, slide reading, content editing, and presentation creation through Natoma. Available tools are a subset of the Google Workspace Server.
***
## Setup
### Step 1: Enable the Google Slides API
1. Go to the [Google Cloud Console](https://console.cloud.google.com/).
2. Make sure your target project is selected in the top project dropdown.
3. In the left sidebar, navigate to **APIs & Services > Library**.
4. Search for **Google Slides API** and click on it.
5. Click **Enable**.
You can also enable it directly: [Google Slides API](https://console.cloud.google.com/flows/enableapi?apiid=slides.googleapis.com)
{% hint style="info" %}
Some Slides operations — such as listing presentations in Drive — also require the Google Drive API. You may enable it alongside Slides: [Google Drive API](https://console.cloud.google.com/flows/enableapi?apiid=drive.googleapis.com)
{% endhint %}
### Step 2: Configure the OAuth Consent Screen
1. In the Google Cloud Console, go to **Google Auth Platform > Branding** (or search "OAuth consent screen" in the top search bar).
2. If the Auth Platform isn't set up yet, click **Get Started** and fill in the following:
* **App name:** Google Slides MCP Server
* **User support email:** your email address — click **Next**
* **Audience:** Select **Internal** — click **Next**
* **Contact email:** your email address
3. Agree to the Google API Services User Data Policy, then click **Continue > Create**.
4. Click **Data Access** in the left menu, then click **Add or Remove Scopes**.
5. In the panel that appears, scroll down to **Manually add scopes** and paste in both scopes (one per line):
```
https://www.googleapis.com/auth/presentations.readonly
https://www.googleapis.com/auth/presentations
```
6. Click **Add to Table**, then **Update**, then **Save**.
{% hint style="info" %}
If your use case requires listing or creating presentation files in Drive, also add the relevant Drive scopes. See the tools table below for per-tool scope requirements.
{% endhint %}
### Step 3: Create an OAuth 2.0 Client ID
1. Go to **Google Auth Platform > Clients > Create Client** and select **Web application** as the application type.
2. Name the application.
3. In the **Authorized redirect URIs** section, click **+ Add URL** and enter:
{% hint style="warning" %}
Use exactly this redirect URI — Natoma will not complete the OAuth flow if it doesn't match.
{% endhint %}
```
https://api.natoma.app/mcp/server/callback
```
4. Click **Create** and copy the **Client ID** and **Client Secret**.
### Step 4: Configure the Connector in Natoma
1. Log in to your Natoma workspace as an Admin and navigate to **Apps**, then search for **Google Slides (Natoma)**.
2. Click **+** > **Allow Personal Connections**.
3. In the connector configuration dialog, enter the following:
| Field | Value |
| ------------------- | -------------------------------------------- |
| Server name | Google Slides MCP (or any descriptive label) |
| OAuth Client ID | The Client ID from Step 3 |
| OAuth Client Secret | The Client Secret from Step 3 |
4. Save the connector. Natoma will initiate an OAuth consent flow to authorize access to your Google Slides.
# Google Workspace
**Type:** Community
**Source Type:** Repository
**Source:** [GitHub](https://github.com/natomalabs/google_workspace_mcp)
**Description:** Google Workspace MCP server provides AI assistants with access to Gmail, Drive, Calendar, Docs, and other Google Workspace applications. It enables intelligent automation and data access across your Google productivity suite while respecting organizational security policies.
**Configuration Parameters:**
* No additional configuration required (OAuth handled automatically)
## **Setup Steps:** Not applicable
---
[Next Page](/llms-full.txt/1)